
This last time I made my yee sang crackers was by using wanton skin. It was OK but still not good enough cause the texture is crispy instead of crunchy. It doesn't give me the umphhhhh feeling. Hahaha....... So, I am trying to make the tradition yee sang cracker this year. I have decided to make the vegetarian version which is eggless. Gosh I am so glad I made it. The texture is superb. Please read on for more.
Ingredients :
150gm all purpose flour
1/8 tspn baking soda
pinch of salt
1 piece red fermented beancurd
15gm cooking oil
70ml water
Method :
(1) combine flour, baking soda & salt into a big bowl, mix well then add in fermented beancurd and cooking oil and stir with hand till cooperated or turns into crumb like texture.
(2) next, add in water and stir till soft dough is formed. Then set aside to rest for 4 hours.
(3) when dough is ready, dust working table with flour and flatten dough with rolling pin till as thin as possible.
(4) now, cut dough sheet into thin strips.
(5) finally, fry till golden over medium heat.
After done leave cool completely before storage.
The result is really satisfying. Just look at the bubbles formed in the crackers.
I divide them into 2 portions easier for later use. Each portions can serve a lou sang for 4-6 persons. Good enough. Hope you guys will like it too. Have fun !


Here presenting my homemade traditional Hakka salted chicken which was passed down by my mother in law. This is a must dish during all occasions. Why ??? During festive season most Chinese families will boil one or two whole chicken for dinning and also for offering ancestor prayer. By end of the day, there will be lots of leftover chicken. And this is how salted chicken begins...... Please read on for more.
STEP 1 : Boiled chicken
***For 2 whole chicken leg, boiled for 20 minutes over medium heat then off the heat and let to rest in the soup for 30 minutes before transfer to plate.
***For whole chicken, boiled for 45 minutes over medium heat then off the heat and let to rest in the soup for 30 minutes before transfer to plate. (for whole chick you need to turn chicken around on and off, so that all part well cooked)
STEP 2 : Rub chicken with salt immediately after out of the soup pot. So that the salt will easily melt & stick to the surface of the skin after cool. Next, after cooling down rub chicken with a bit of light soy sauce and then steam for 10 minutes over medium heat for whole leg only and high heat for whole chicken. Off the heat then only bring out the chicken 20 minutes later. This will give time for the salt to do its work.
Note : for leftover chicken meat, rub all chicken with salt then go straight to steamer. Adjust the quantity of salt according the leftover meat. Then can keep in the fridge after cooled.
*** for 2 whole chicken leg ~ 2.5 tspn of salt or adjust as your own preference but the more the merrier.
*** for one whole chicken ~ roughly about 1 TB or more salt (1.8kg chicken) need to rub inner core as well.
STEP 3 : Let chicken totally cool and you can either wrap it up for storage. Best to keep in freezer or fridge. Keep the chicken stock as well. It tastes superb.
STEP 4 : For serving, just chop the chicken into small pieces and add in the stock. Again steam for 15 minutes over high heat before serving. At this stage, you can actually smell the difference. Something like wax duck. Super duper tempting. Hope you will like it too ! Enjoy.

My 2nd batch of homemade chicken meat jerky @ bak kaw is finally ready. This round I have improved the texture and the flavouring at the same time. Gosh, it turns out just the way I wanted. Thank goodness ! This round the texture is more chewy compared to my 1st attempt. It is best not to reduce the sugar level as well. For Keto consumer, just replace it with Lakanto.
Please read on for more......
Ingredients :
400gm-500gm chicken breast minced (about 1 pce)
2 TB oyster sauce
2 TB sesame oil
1 TB shaoxing wine (best to use Rose wiine)
2 TB light soy sauce
2 tspn dark soy sauce
1/2 tspn salt
2 TB curry powder
2 TB wheat starch
1 TB tapioca starch
100gm sugar
Method :
(1) combine all ingredients into a big bowl then mix till well cooperated. Best to use a mixer for kneading purpose, this will help to give you bouncy texture.
(2) make sure the chicken minced meat became starchy and stick together. Then cover with lid and keep chilled for 3-4 hours or overnight.
(3) next, spread on a 10x14" baking tray lined with greased proof paper. After nicely spread then again keep chilled for another 3 hours or till set, but best to keep overnight.
(4) now, once its ready bake at preheated oven at 160'C for 20 minutes. At this stage, the meat is cooked and moisture released 50%. The tray is wet. So, cut the meat into 6 portions then transfer to another dry tray.
(5) next, put it back to the oven and bake at 185'C for another 20-25 minutes or till the meat became dry and nice. Easy to manage as well.
(6) at this stage the moisture is almost 90% released and the meat will look dry and nice.
(7) now, prepare 4 TB of honey mix with 1 TB of water for grilling purpose.
(8) place meat slices to baking tray and bake at preheated oven 200-220'C spread on honey mixture every 3 minutes on both side, untill you are happy with the colour.
You may either use syrup for grilling purpose, instead of honey but honey is less sweet compare to syrup.
This round I managed to control the heat and the thickness as well. Oh man, looks fantastic ! Surprisingly, hubby eating none stop.
haha..... cause my hubby not a bak kwa lover.
Hope you guys will love it too. Enjoy !

Meat jerky is one of the popular snack during Chinese New Year. It is super tasty and addictive and of coz expensive too.
haha...... This is my very first attempt making homemade meat jerky. As my family not pork person, so I made chicken instead. It looks as fantastic, isn't it ? Please read on for more.

Ingredients :
800gm -1 kg chicken breast minced (about 2 pcs)
4 TB oyster sauce
4 TB sesame oil
2 TB shaoxing wine (best to use Rose Wine)
1 TB fish sauce
4 TB light soy sauce
2 tspn dark soy sauce
1 tspn salt
2/3 tspn Chinese 5 spice powder
180gm sugar
Method :
(1) combine all ingredients into a big bowl then mix till well cooperated.
(2) make sure the chicken minced meat became starchy and stick together. Then cover with lid and keep chilled for 3-4 hours or overnight.
(3) next, divide minced meat into 2 portions then spread on a 10x14" baking tray lined with greased proof paper. After nicely spread then again keep chilled for another 3 hours or till set, but best to keep overnight.
(4) now, once its ready bake at preheated oven at 160'C for 20 minutes. At this stage, the meat is cooked and moisture released 50%. The tray is wet. So, cut the meat into 6 portions then transfer to another dry tray.
(5) next, put it back to the oven and bake at 185'C for another 20-25 minutes or till the meat became dry and nice.
(6) at this stage the moisture is almost 90% released and the meat will look dry and nice.
(7) now, prepare 4 TB of honey mix with 1 TB of water for grilling purpose.
(8) place meat slices to baking tray and bake at preheated oven 200-220'C spread on honey mixture every 3 minutes on both side, untill you are happy with the colour.
Loving the colour so much and smell heavenly <3 What do you think !

My first attempt on Siamese Laksa which I have been craving for a long while. Finally, I did it !
Yayyyyy ........ It was not as hard as I thought and no complication as well. Super addictive exotic flavoured laksa noodle. I polished off two bowl in a roll.
haha...... Please read on for more.
(Recipe adapted to
here )
Ingredients :
3 ikan kembung (chubb mackerel) gutted & scaled
8 slices asam keping/gelugor )dried tamarind skin)
6 kaffir lime leaves
20 stalks daun kesum/Vietnamese coriander/mint
4 TB brown sugar
3 tspn salt
1 tspn seafood granules
400ml thick coconut milk
3 cups water
1 pkt dried thick vermicelli. soaked an hour before boiling(EKA brand)
Garnish :
1 small cucumber, julienned
1/2 pineaaple, julienned
1 red onion, thinly sliced
2 red chilies, thinly sliced
6 stalks mint leaves, stem removed
2 bunga kantan/torch ginger, thinly sliced
2 lime, cut into wedges
Ingredients for Blended Paste :
7 dried chilies, soaked
in warm water & seeded
7 red chilies, seeded
and cut into pieces
10 shallots, peeled and
cut
1 large onion
2 stalks lemongrass, bottom
third only, thinly sliced
3 inch galangal (100gm)
2 inch fresh
turmeric (peeled)
(Blend ingredients into paste
with some water then set aside)
Method :
(1)
Bring 3 cups water to a boil. Add mackerel,
lower heat to medium low and poach for 15 minutes. Remove fish when cooked.
Strain liquid with a metal strainer.
Keep the stock for later use.
(2)
once fish is cool
enough to handle, remove bones and flake the meat. Break into small chunks.(3)
Preheat wok with 1
cup cooking oil, fry blended paste & kaffir leaves till fragrant or oil
separate (pecah minyak), then add in asam keeping/gelugor, daun kesum, water
and coconut milk. Let to boil for 15 minutes.
(4)
Next, add in fish
meat flakes, sugar & salt to taste, seafood granules and continue simmer
for another 10 mintues.
(5)
soaked EKA dried
Laksa noodle for an hour before boiling, then boil till soften. And then serve
with laksa gravy and garnish with the ingredients.
I skipped mint leaf cause ran out of stock. So, gather whatever I have and serve. I was really really good.
It was well received by everyone and thumbs up by my friend & her family. Hope you will like it too ! Enjoy.

Here's my all time favourite zhongzi 粽子. I always love my zhongzi loaded with beans and this round made something slightly healthy. Less glutinous rice which is tummy friendly for some elderly. I made with 50% of brown rice and 50% of glutinous rice or maybe you may use Japanese rice @Calrose rice. This zhongzi is very well received by friends who had tried it cause it tastes a bit like 5 grain rice. Still I love the beans .....
haha.... Please read on for more.
Ingredients for fillings :
250gm mushroom,
soaked till expand
80gm dried
shrimps, soaked for 30 minutes
1 TB garlic chopped
1
shallots, chopped
4 TB oyster sauce
3 TB light soy
sauce
2 tspn pepper
powder
1 tspn vegetarian
granules
1 cup water
*Thickening : 2 tspn
cornflour mixed 2 TB water
Method :
(1)
Drain off soaked dried shrimps and set aside
then drain off mushroom and slice into chunks.
(2)
preheat wok with 5 TB cooking oil, fry shrimp
till fragrant then stir in chopped garlic & shallots and continue saute
till fragrant.
(3)
Now, add in mushroom and stir fry for 5 minutes,
then add in the remaining ingredients and continue cooking till water almost
dry off. Finally, add in thickening and cook till thickened. Best to prepare the
fillings the night before and keep chilled before use.
Ingredients :
500gm Brown Rice,
soaked for 2 hours
500gm glutinous
rice, soaked overnight
250gm red beans,
soaked overnight
150gm black eye
peas, soaked overnight
3 tspn five spice
powder
5 tspn salt
1 tspn vegetarian
granule
2 tspn pepper
powder
60 pcs bamboo
leaves
A bunch of straws
15 salted egg yolk, cut into half
1 TB garlic
chopped
1 shallots, chopped
2/3 cup cooking oil
Method :
(1)
Drain off both rice and all the beans. However,
I didn’t soak the red beans but cooked it with pressure cooker for 10 minutes
the night before instead and then keep chilled.
(2)
Preheat wok with cooking oil, saute garlic &
shallot till fragrant then add in both rice, 5 spice powder, pepper powder,
salt & vegetarian granule. Cook till fragrant and stir till well
cooperated. Finally, add in both beans and continue stirring for another 5
minutes or till everything looks dry and nice.
(3)
For bamboo leaf & straws, you may either
soaked it night before or boil it instantly to soften it.
(4)
Now, wrapped rice, ½ salted egg yolk, one
tablespoon of mushroom fillings and then cover it with extra rice mixture. Then
nicely sealed.
(5)
Finally, cook for 40 minutes by using pressure
cooker or at gas cooker for 1-1/2 to 2 hours.
Bet you won't stop at one too <3 Enjoy !

Hi everyone, as promise here is my banana zebra cake recipe. I am actually has been chased by the left out banana that I bought some day back. Totally forgotten about it. Luckily, found it yesterday and still be able to make something out of it. I made one yesterday with a 9" tray. It was really good but the cake wasn't tall enough for my photoshot.
haha..... So, made the rest of the banana today with a 8" tray. Gosh, it turns out perfect. Hope you guys will love it too.
Please do email me if there's any questions.
kristygourmet@gmail.com
Ingredients : (size 8" tray)
Portion A
7 egg yolk
1 egg
70ml corn oil/melted butter
120gm mashed banana
110gm all purpose flour
1/4 tspn salt
Portion B
7 egg white
100gm fine sugar
1/4 tspn cream of tartar
Portion C
1 tspn chacoal powder
1-1/2 tspn hot water
(mix well and set aside)
Method :
(1) Portion A : beat eggs till pail & fluffy then add in mashed banana, salt & oil and beat till well combined.
(2) now, fold in flour and beat till well cooperated and set aside.
(3) Portion B : whisk egg white till foamy then add in cream of tartar and continue whisking for about 1 minute.
(4) next, add in sugar 1/3 at a time about 2 minutes each batch till egg white became stiff and meringue like.
(5) now, transfer egg white to Portion A in three batches and stir till well combined. Do not beat the mixture, as this will create more air in batter.
(6) then divide batter into 2 portions in separated bowl.
(7) add Portion C to one portion of batter and mix till well cooperated.
(8) finally, alternately pour in both batter in equal portions to a 8" tray lined with baking paper, with the side coated with butter. (I used 2 medium size soup paddle)
(9) and then bake at preheated oven 160'C under water bath method, for about 70 minutes or till tester came out clean.
Tips : make sure you tap your baking tray on working table after each addition of batter, this will helps batter to spread and gives you better outcome.
Tips : water bath method meaning put the batter tray to a bigger tray filled with hot water on it. This is also called as steam bake method. After 70 minutes of baking time, mine is about to dry out.
Love how it turns out ! The cake looks really tall and gorgeous.
And really fluffy & soft <3 <3 and smells really good too. No artificial essence or flavouring. wholely fresh banana...... Loving it so much.

I haven't been baking X'mas fruit cake for many years cause my boy doesn't like the dried cherry. The other day I mentioned to him that I wanna to make one this year, and he quickly give me the look .....
haha..... I was like Ok OK no fruit cake ! So after cleaning my fridge, found some leftover kurma @ dried dates & dried figs and decided to clear off by making kurma & date cake. Wow.... it was surprisingly good. Please read on for more.
Ingredients :
200gm dried kurma @ Date, seeded & sliced
200gm dried figs, sliced
380ml boiling water
150gm butter at room temperature
170gm brown sugar
3 eggs
225gm selfraising flour
1 tspn baking soda
Method :
(1) soaked kurma and sliced figs into boiling water for an hour or till softened, then puree it with blender.
(2) beat butter and sugar till fluffy then beat together the kurma & fig puree till well mixed.
(3) next, beat in egg one at a time till well cooperated.
(4) now, stir in flour & baking soda till everything well combined.
(5) transfer batter to a 8" baking tray lined with greased proof paper at the bottom and flour coating on the side of tray. Then decorate the top with pecan of walnut.
(6) finally, bake at preheated oven 175'C for about 60 minutes or till tester came out clean.
The cake turns out really moist & fluffy and so scrumptious. Quite addictive too ! Bet you can't stop at one. My boy said much much more yummy than fruit cake, and not so sweet.
haha...... Enjoy & Happy thanksgiving to all.

My 2nd attempt making ginger wine. After a 3 whole months of waiting, I am truly happy with the result. It turns out really strong and smell really good compare to the previous batch I made. Just harvested today. Can't wait to try it in my cooking soon .... ginger mee suah, ginger wine chicken, steamed fish, steamed chicken ...... and many more >o< Please read on for more.
Couldn't find bentong ginger, so get the Thai bentong ginger instead. Not bad, at least better than the Chinese ginger.
Ingredients :
1kg bentong ginger750gm (3pkt) rock sugar6L water2pcs sweet wine biscuit2pcs spicy wine biscuit
Method :1. wash ginger then blow dry under the sun, cut into small pcs.2. bring rock sugar, ginger slices and water into boil, keep boiling for 30 minutes over medium heat.
3. then leave cool overnight.
4. crushed wine biscuit into powder form and set aside, then transfer half of the cooked ginger & water into a 10L glass jar. Add in wine biscuit then transfer the remaining ginger & water into the jar.
5. cover jar with a clothe then top with a ceramic plate. But because afraid of unwanted visitors, I cover it with plastic sheet with some tiny holes.6. let the jar stay in a dark place for 3 months, stir mixture every 2 weeks.
This is the situation of the wine after each stirring. It turns back to light brown colour after one day time.
Finally, harvest time ............... what a happy day !
I pureed all the ginger slices and keep in separated jars, which is easier for later usage & storage as well. Elderly called this as ginger head @ keong tao. Best to add into the next batch of ginger wine making.
Here what I get from the harvest. 6 bottles of wine and few jars of ginger head. What a blessing !

To my dearest reader, as promised I am written down the details as requested. However, more practice may helps to make perfect. So, I hope you will try and have fun. Please read on for more.
Ingredients :
150gm all purpose flour
130gm glutinous rice flour
1 tspn yeast
40gm fine sugar
50gm gula merah/palm sugar
1 tspn dark soy sauce
100gm water
100gm hot water
2 tspn cooking oil
* extra cooking for coating
* some banana leaves for lining or silicon sheets
Method :
(1) combine both sugar & dark soy sauce into hot water till dissolved, then stir in water & yeast and let to rest for 5 minutes. But before adding in the yeast, make sure the water is not too warm. Otherwise the yeast won't be able to survive there. (feel with your fingertips)
(2) now, combine flour & glutinous rice flour till well mixed then stir in cooking oil and knead till smooth. At this stage the dough is slightly sticky, let to rest for 5 minutes.
(3) as dough will be slightly sticky as picture shown the above, use a plastic scraper to do the work and divide dough into 10 equal portions.
(4) next, round dough as position given as follow.
Step.1 ~ press center of dough and push the side inwards and then again push another side inward to form a ball on one end. The pushing will force the round end to release excess air and to form smooth surface.
Step.2 ~ now, a ball will be formed then rub with cooking oil and round it nicely.
Step.3 ~ place it to a steamer tray lined with banana leaf and let to rest for 25-30 minutes. Do not over proof, as more bubbles to be formed the higher the shrinkage.
Smooth surface ..... licin licin kilat kilat >o<
Finally, steamed at preheated steamed for 12 minutes. Once its done, off the heat and let it sit in the steamer for 1-2 minutes before transferring out. This will reduce shrinkage. See, the outcome very very cantik and licin the face (means beautiful & smooth), right !
haha..... Hope this will help. Have fun !

Introducing another easy method of making a streusel cake or coffee cake with a deliciousness of apple fillings. I wanna to pamper myself with some sweet little dessert to keep my happy soul lifted. So, make a quick one >o< Please read on for more.
Ingredients :
(A)
2 cups all purpose flour
2/3 cup sugar (I used brown sugar)
1/2 tspn baking powder
1/2 tspn baking soda
a pinch of salt
230gm cold butter, chopped
(B)
3/4 cup heavy cream
1 egg
1 TB lime juice & zest
1 tspn vanilla essence
(C)
4 green apple, diced
100gm sugar
1 tspn cinnamon powder
3 TB cornstarch
(combine all ingredients and cook till softened then set aside to leave cool)
Method :
(1) for ingredients (A), combine together flour, baking powder, baking soda, sugar & salt and mix well. Then rub in butter till everything well cooperated and reserved one cup for topping later on. The best is to keep the remaining mixture refrigerated.
(2) for ingredients (B), beat everything till well mix then fold into ingredient (A) mixture till everything well combined. The texture should be something like muffin mixture.
(3) place batter into a 7" tray pan lined with parchment paper.
(4) next, spread ingredient (C) all over the top of the cake batter.
(5) then top with the remaining crumble mixture of ingredient (A).
(6) finally, bake at preheated oven 175'C for about 55 minutes. The top crust should be in nice golden brown colour.
Oh.... here comes my baby ! So yummy.... hope you will love it too.

I made some sambal sauce today to stock up for my daily cooking. I normally will make in batches once in 2 months time or sometimes once in six months. Though I don't use it everyday, just stock up for emergency >o< You never know, right !
haha..... Please read on for more.
Note : Kindly contact through email if you have any questions. Thank you.
From the kitchen of
My Little Space >o<
Ingredients :
40 dried chilies, cut and washed
10 red chilies, seeded & sliced
8 shallots (medium size), sliced
5 cloves garlic
3 stalk lemongrass, take only the white part & sliced
1/2" toasted Belacan
2 tspn asam paste (Adabi asam paste)
some water
salt to taste
1 tspn granules
1-1/2 cup cooking oil
2 TB gula melaka/brown sugar
Method :
(1) after cut and washing dried chilies, then cook it over medium heat till soft about 15 minutes. Discharge chilies from hot water to reduce the seeds from going together.
(2) next, blend dried chilies, red chilies, shallots, garlic & lemongrass with some water into paste.
(3) now, heat up work with cooking oil and cook blended paste over medium heat.
(4) while the mixture starts bubbling, add in the salt to helps in putting away the unpleasant smell from the dried chilies. Continue cooking till you can see the separation between oil and mixture.
(5) now, add in asam paste, belacan, gula melaka, granules and some water, continue cooking over medium-low heat.
(6) once the chili paste became thick & fragrant and you can clearly see the oil separation. That's mean it is ready.
(7) off the heat and leave cool before bottling.
I love to make stir fried bihun or vermicelli with the leftover oil from the wok after preparing the sambal. You may add a little more sambal to the bihun as personal preference & taste. An extra lime juice or calamansi juice will definitely tempted me for more. Simply love it ..... yummm.....

As requested by my boy, prepared another 2 loaves of cheese bread loaf. One with spring onion sausage & cheese and the other one just plain cheese loaf for myself. Both taste sinfully delicious. I actually using the spring onion sausage bread slices to make pull apart chicken sandwiches. Another deliciousness packed full of super flavour in one. Please read on for more.
Ingredients for
dough :
350gm bread flour
200gm all purpose flour
3 TB Parmesan cheese powder
1-3/4 tspn yeast
250 ml warm milk, warmed
3 TB sugar
1/2 tspn salt
1 egg
50ml mayonnaise (one small pkt)
3 TB olive oil
**Fillings : 1 stick black pepper sausage, chopped (for one bread roll)
** handful of spring onion, thinly sliced (for one bread roll)
*100gm cheddar cheese block, grated finely for topping
Method :
(1) combine milk, sugar & yeast to rest for 5 minutes or till bubbling.
(2) now, mix both flour, cheese powder, milk mixture, salt & egg. into a large bowl and mix to form sticky dough.
(2) add in oil and continue kneading till smooth dough is formed, then leave to rest for an hour or till double in size.
(3) now, punch to release excess air and knead till smooth then divide into 2 equal portions.
(4) place dough to working table and flatten it into 8x12" sheet then spread on spring onion & sausage.
(5) roll dough to form a swiss roll then place it to a 4x4x9" tray lined with parchment paper.
(6) leave to rest for 30-40 minutes then brush the top with some butter and then spread on the grated cheese.
(7) finally, bake at preheated oven 185'C for about 20-25 minutes or till golden brown. (on lower rack)
Just imagine how it smells ! Totally on cloud 9. Bet you are going to make extra loaf.

Another hectic day or rather a headache day, sometimes really no idea what to prepare for the family, as the father and son love different dishes
....haha ..... I tried not to cook extra dishes cause they don't like taking leftover food the next day either. See what I mean by "headache day" ! Me is OK with anything but not them. So, final decision making spicy food for them. Not actually spicy but this masala chicken tastes a little bit similar to nyonya chicken kapitan, except the smell its different. But very very tasty and best to go with the rice. I am glad I am making the right choice. Please read on for more.
Ingredients for
simple pilaf rice :
2 bay leaves
2 star anise
1 cinnamon stick
5 cloves
1 tspn cumin powder (mixed with 2 tspn water)
1 shallots, sliced
2 cups rice, wash & rinsed
2 cups water
some olive oil
Method :
(1) heat up a pan with some olive oil and saute sliced shallots till fragrant, then add in bay leaves, star anise, cinnamon stick, cloves and cumin paste, continue cooking till fragrant then off the heat.
(2) now, put everything into rice cooker and cook till done.
Ingredients :
1/2 chicken, cut into bite size
1/2 cup yogurt
1 TB red chili powder
1 TB paprika powder
1 tspn turmeric powder
1 green chili, sliced
1 red chili, sliced
1/2 yellow onion, sliced
1 lime
1 TB biryani mixture powder/masala mixture powder (mixed with 1-1/2 TB water)
1 cinnamon stick
2 star anise
5 pcs cloves
2 pcs bay leaves
salt & chicken granule to taste
Ingredients for
tomato puree :
220gm tomato puree (one small canned)
3 large tomato, sliced
1-1/2 yellow onion, sliced
5 cloves of garlic, skinned
1" ginger, sliced
1/2 cup yogurt
(grind with electric blender till smooth, set aside)
Method :
(1) marinade chicken with chili powder, paprika powder, turmeric powder & yogurt for 30 minutes.
(2) then pan fried till brown, as picture shown below.
(3) remove chicken from pan then add in some cooking oil and stir in star anise, cloves, cinnamon stick & bay leaves. Cook with low heat till fragrant then add in masala paste and continue cook with low heat till fragrant.
(4) once its ready, add in the tomato puree mixture and cook with high heat.
(5) when the mixture starts bubbling, now add in chicken, green & red chilies and onion.
(6) best to cook over medium heat at this point, till tomato puree became nice thick. Finally add in lime juice, salt to taste and a little bit of chicken granule. If you prefer more liquid then you may add some cooking cream & extra tomato puree.
As my family prefer dry version, I cooked a little bit dryer which you can see the paste is starting to separate from oil (pecah minyak as the Malay saying). Gosh, smells really inviting ! Hope you guys will love it too. Enjoy.

Recently I've been busy watching some really nice K drama. Now, I am in the mood wanna to make some Korean dishes.
haha..... I haven't done much Korean food for a while especially when my kids not around. I am glad my boy is back and will be around for some time, I am taking this opportunity to discover more delicious recipes. And this recipe is actually inspired by
Seonkyoung Longest and I am trying to make it into a halal dish by using chicken meat. And it is actually quite good and interesting too. Please read on for more.
And here is what I did from scratch. Since some ingredients are not available here, I just substitute with other items. It works pretty well actually.
Ingredients :
2 large chicken thigh, deboned (or 3 medium size)
1 large yellow onion, sliced
1 green chili, sliced
1 red chili, sliced
2 stalk of spring onion, cut into 1" length
1 TB toasted sesame seeds
Ingredients for
marinade :
3 cloves garlic, minced
1/2 TB canyenne pepper
1 TB red chili powder
1 tspn chili flakes
2 TB plum sauce / honey
1 TB mirin ( I used rice wine)
1 TB fish sauce
a dash of pepper
1 tspn ground black pepper
2 TB light soy sauce
a sprinkle of chicken granule
(combine everything into paste)
Method :
(1) sliced boneless chicken thigh into bite size stripes then mix into spiced paste together with the yellow onion. Set aside and let to rest for 20 minutes.
(2) heat up a frying pan with a little bit of cooking oil, then stir in the chicken mixture and cook over high heat, till everything nicely cooked. It took about 15-20 minutes.
(3) once the meat is cooked thoroughly, then stir in sliced red chili, green chili and spring onion. And let to cook for another 2 minutes.
Finally, it's all done within an hour. Quick and easy to prepare. My family really loves it especially my boy. By the way, if you prefer extra spicy, you may still add an extra chili powder or chili flakes.
Since I still have extra rice left from my one pot chicken rice lunch, so just perfect to serve along with my chicken bulgogi. What a fantastic combination !
Yum.... yum.... Hope you guys will love it too. ye... mas-issneun jeulgisibsio

I bought a kilo of purple sweet potatoes a few days back and not sure what to make...... I used half of them to make six flavour tong sui dessert and still have another half kilo left sitting there. Oh well, I wanna to make something quick and simple, so that I can go aftering my K drama later on.... haha.... Finally, decided to make sweet potato mousse which is easy to prepare. On the other hand, bake a quick sponge and Swiss roll is the best choice cause no need cake dividing or things like that. Just spread and roll it up. And then end of the story ......
haha.... Oh mygoodness ....
haha... Please read on for more.
Ingredients for
Sponge Cake :
(A)
4 egg yolk
20gm fine sugar
60ml milk
40ml corn oil
70gm cake flour/all purpose flour
1 tspn vanilla extract/essence
(B)
4 egg white
50gm fine sugar
1/4 tspn cream of tartar
Method :
(1) from ingredients (A), hand beat sugar and egg yolk till creamy, then add in flour and milk alternately with in 3 batches till everything well cooperated. Then stir in oil &vanilla and Set aside.
(2) Ingredient (B), whisk egg white till foamy then add in cream of tartar and half of the sugar. Continue beating till thick & foamy. Add in the remaining sugar and beat till top foam.
(3) now, fold meringue into mixture (A) till everything well blended. Do not over mix.
(4) transfer batter to a 9x11" baking tray lined with parchment paper.
(5) finally, bake at preheated oven 180'C for 25 minutes.
(6) once its done, unmould cake with placing a wax paper or non-stick baking paper over the surface of the cake then top with another layer of kitchen towel or silicon sheet, flip over the cake. This is to prevent the cake surface from sticking to the sheet while removing it later.
(7) remove baking paper then roll cake together with the silicon sheet or kitchen towel, into swiss roll while its still warm. Leave it to cool down in rolled shape.
Ingredients for
Sweet Potato mousse :
500gm purple sweet potatoes
200gm butter, diced
100ml whipping cream
Method :
(1) skinned sweet potatoes then sliced into small pieces and then steamed for 15 mintues.
(2) once its ready, mashed into puree then stir in butter chunks till everything well cooperated.
(3) next, press sweet puree through a fine sieve and discharged any remaining chunks.
(4) whipped cream till set then fold into sweet potato puree till well combined.
(5) finally, transfer mixture to 2 different pipping bags.
TO ASSEMBLE :
(1) once the cake has cooled, unroll the cake as picture shown below.
(2) now, pipe in the sweet potato mousse and then spread evenly with a plastic gadget as picture shown below.
(3) Finally, carefully roll it up into Swiss roll as picture shown below.
(4) now, decorate the Swiss Roll with the remaining sweet potato mousse as your own preference.
Finally, keep chilled and serve. Sinfully delicious ! Love it so much.

Gosh, I can't believe it this is actually my number 1000 posts after exactly 10 blogging years ! I am truly blessed that I can make it this far. And this post is specially prepared under the request of my readers. So, guess this is the best way to celebrate my number 1000 posts >o< Hope you guys will love it too ! Please read on for more.
Ingredients for Rice Ball :
3 cups cooked rice (must be soft)
2 pkt x 50gm mayonnaise
1 tablespoon lemon juice
1 canned x 150gm tuna chunks in oil (discharged oil)
3 tablespoon mushroom floss
1 tablespoon nori flakes
1/2 tspn salt
1 tspn mushroom granules
1/2 tablespoon ground black pepper
Ingredients for coating :
1 egg beaten
1-1/2 cup bread crumb
Method :
(1) Combine all rice ball ingredients and mix well. Then divide into 14 portions with an ice cream scope.
(divide into small portions for pressing)
Can either hand press or by using a gadget.
(2) Now, press to round the mixed rice between a plastic sheet or you may also use a onigiri press gadget (as picture shown the above)
(3) Next, dip rice ball into beaten egg and then coat with bread crumb. Finally, deep fried till golden brown.
Do make sure deep fry over medium low heat to get the perfect colour balance. Other than that try use really soft cooked rice for this recipe. If you're using leftover chilled rice then make sure steam it before used.

Just a reminder for myself that this is actually my number 999 post after almost 10 years of blogging. Truly happy that I am still be able to make it this far and also thanks to my readers. Love you guys ! I have a few vegetarian cake recipes but have yet tried any with mayonnaise in my vegetarian baking. This vegetarian mayonnaise is the only branding available in the market right now. Best to use it as a substitution of egg replacement. I am truly I have finally tried it and now I have more option in baking my vegetarian cake. The texture turns out really satisfying. Love it so much. Please read on for more.
* This is not a paid post*
Ingredients :
250gm all purpose flour
1 tspn baking powder
1 tspn baking soda
50gm cocoa powder
150gm fine sugar
1 tspn vanilla essence/extract
250ml hot brew coffee, leave cooled
230gm vegetarian mayonnaise (one bottle)
Method :
(1) place all dry ingredients into a big bowl and mix well.
(2) next, stir in coffee, vanilla and mayonnaise mix till well cooperated.
(3) transfer mixture to a 8" silicon baking tray, greased.
(4) then bake at preheated oven 175'C for about 45 minutes to 60 minutes or till tester came out clean.
(5) leave cool completely before frosting.
Ingredients for
chocolate ganache :
250gm chocolate chips
170ml heavy cream
(cook heavy cream over low heat till bubbling, not boiling, then place in chocolate chips and off the heat. Leave it untouched for 5 minutes. Then stir to well cooperated and finally spread over the cake)

This has been my all time favourite project.... the bread making especially this Danish bread loaf. Oh well, a super tedious project but brings great satisfaction and makes you smile along the process. Only a true baker will know such a feeling. Hope you will love it too ! Please read on for more.
Ingredients for
danish dough : (for one 4x9" tray)
230gm bread flour
100gm all purpose flour
16gm milk powder
1/2 tspn salt
1-1/2 TB sugar
1 tspn instant yeast
2 small eggs (about 90gm)
40ml milk
70ml water
40gm cold butter, chopped
*180gm butter
Egg glazing : 1 egg yolk mix with 1 tspn milk
* some mixed herbs garlic butter to spread
Method :
(1) combine all ingredients (except butter) into a big bowl and stir to form a soft dough then add in butter continue kneading till everything well cooperated.
(2) shape dough into a ball then keep it into a plastic bag and slightly flatten it Keep refrigerated for overnight or at least for 4 hours.
(3) for butter, weight the butter then cut into 6 portions, arrange butter into a small plastic bag which about 4 to 5" big then press to flatten into equal square size. Keep refrigerated till set. (But I had mine done in the easiest way, just cut the cold butter into big chunk and lined straight onto the dough.)
(4) now, after brings out the cold dough from fridge, place it to working table and knead till smooth for about 2-3 minutes. Then add some flour to the working table, and make sure the dough is well coated with flour then flatten dough into flat sheet about 15x15" size. Finally, place cold butter into the center and fold like an envelope to seal, as pictures shown below.
(5) after sealed, use rolling pin to press and roll dough into long thin sheet as picture shown below. About the size of 12x30" and make sure you sprinkle some flour while rolling it.
(6) now, fold flat dough into 3 folding as picture shown below. Then keep chilled for about an hour before the second process. This will helps the melting butter to get set.
(7) when dough is ready, place it to a slight floured working table. By using rolling pin, flatten it by pressing dough from one end to the other longer end. Then roll it to get smooth surface.
(8) now, again make another folding by placing both end overlap meeting in the center, as picture shown below. We called this as 4 layers stacked laminating.
(9) after that make another fold to generate 4 layer laminating as picture shown below.
(10) again keep chilled for an hour till melting butter is set.
(11) now, again flatten laminating sheet by pressing one end to the other end and always choose the longer side to enlarge the sheet. Once its done, spread readymixed herbs garlic butter over the flat dough. Then make a 3 fold laminating, again put it back to the fridge and keep chilled for another an hour till butter set.
(12) and here comes the final rolling, brings out dough to a slightly floured working table and flatten it around the size of 12x20", then divide into 2 portions. Make another 2 cuts on each portions to get 3 stripes each, for the pony tail pleating.
(13) once the pleating is done, roll dough into round shape as picture shown below.
(14) then place it to a 4x9" baking tray lined with greased proof papper as picture shown below.
(15) let dough rest for another 2 hours or till double in size. Then brush with egg glazing before going into the oven.
Finally, bake at preheated oven 210'C for 25 minutes then turn it the other way round and continue baking for another 20 minutes under 195'C or till golden brown.
Olala..... this is the final product that I get @@@@ SUPER LOVING IT @@@ Have fun guys !

This is something I don't make often which is extremely addictive. I am terribly addicted to the aroma, the sweet sensation and the exotic flavour of it. Never get enough of it.....
haha.... That is why I don't make this often. I made this continuously in two days and ran out of palm sugar in the second day. So, have no choice that I have to use brown sugar which is not AS good as the palm sugar ones. However, still addicted to it ......
haha..... Please read on for more.
Note : Kindly email me directly if any quiestions. Many thanks
Ingredients :
(A) Bottom Layer
500ml water
145gm sugar
300ml thick coconut milk
10gm agar-agar powder
1/3 tspn salt
400-500gm chendol
* 1 cup readymade Azuki beans
(B) Top Layer
500ml water
160gm palm sugar/brown sugar (50%/50%)
300ml thick coconut milk
10gm agar-agar powder
1/3 tspn salt
Method :
(1) for ingredients (A), combine water, coconut milk, sugar, salt & agar-agar powder and bring it to boil or till sugar dissolved. Then switch to low heat and stir in the chendol. Let it simmer for 2 second.
(2) next, off the heat and transfer hat mixture to a 9x13" tray or 10x10" tray.
(3) finally, spread azuki bean all around the hot mixture and let it cool to set.
(4) now for ingredients (B), combine water, coconut milk, sugar, salt & agar-agar powder and bring it to boil or till sugar dissolved. Then off the heat.
(5) before transferring ingredients (B) into (A), make sure you use a folk to make some scratches on the surface of the bottom layer, so that the top layer can join well together.
(6) now, slowly pour the ingredients (B) to (A) and let it cool down till set.
(7) best to keep chill before serving.
Now, this is how it looks by using a 9x13" tray. Slightly thinner in layers but more classy and easy to slice.
And this is the first batch I made with palm sugar and in a smaller container which is thicker in layers, but extremely extremely yummy. Gosh, feel like I wanna to make this again. Salivating just by looking at it.........
haha.... Enjoy guys ! And have a great week ahead.

My first experience in making crispy veggie flakes. Normally, many of them used kale to make into kale chips. Kailan has the more or less similar texture with kale, so I tried it out and it came out wonderfully. It's crispy and flaky at the same time. Please read on for more.
Note : Kindly email me directly if there's any questions. Thank you.
Method :
Get a bunch of kailan and just collect the green part, wash thoroughly and dry it up with a towel then cut into thin shreds.
Next, fry them in hot oil till turn into dark green colour mean its done. Set aside to drain the oil.
Or you may use an oven to bake at preheated 200'C for about 15 minutes then flip and bake for another 5 minutes.
Finally, sprinkle on some salt to taste and keep into an air tight jar for at least 2-3 days.

My roti cheese sandwich roll is actually inspired by LIANG. I remember a few weeks back my daughter and I went for a movie, saw this LIANG stall and bought one to try. Oh wow, it was so good ! I knew I am going to try it out in my home kitchen some day and finally I did it. I am truly happy. It was really yummy. Even my kampung boy hubby also gave me thumbs up.
haha..... Please read on for more.
Note : Please email me directly if there's any questions. Thank you.
Ingredients :
one packet of ready made roti canai (I used Kawan brand original)
5 eggs (one egg for each roti)
pepper & salt to taste
some spring onion, thinly sliced
shredded cabbage
cherry tomato
mayonnaise
Method :
(1) preheat frying pan then rub frying pan with a thin layer of butter or cooking oil.
(2) once the heat is warming up, place in a piece of ready made roti canai and cook over medium heat till brown with both side.
(3) in the other hand, beat an egg then add in spring onion and some seasoning to taste.
(4) once the roti is done, set aside.
(5) now, lower the heat and place in beaten egg, try to round it if possible.
(6) then quickly place in cooked roti before egg is totally cooked, so that they will merge together easily.
(7) when the egg is cooked, flip roti the other way round and place in mozzarella cheese, then again flip it the way round again. Let it cook for one second or till you get the smell of cheese.
(8) transfer to serving plate and throw in whatever you want for your fillings. For me, I am placing in some shredded cabbage and cherry tomatoes then top with some mayo. yum yum...
Finally, roll it up like a swiss roll and serve warm. Oh man, this is super delicious ! Bet your kids will ask for more. Enjoy !

We have beef rendang and chicken rendang for most of the time but what about prawn rendang ! Just trying out my homemade prawns rendang the other day. Gosh, it was so delicious that, hubby finger licking good.
wakaka...... Something wonderful to share with my readers. Can you imagine the prawn rendang is now on your serving plate ...... yum...yum...yum....
Note : Please feel free to email me if any questions.
(Recipe adapted to
Raya Ajinomoto)
Ingredients :
100ml coconut milk (mixed 100ml coconut milk with 50ml water)
2 pcs kaffier leaves
1 pce turmeric leaf
a pinch of granules (Ajinomoto)
salt to taste
1/2 tspn brown sugar
1/2 TB Kerisik kelapa (toasted coconut)
20 medium size prawns
Ingredients for
blended paste :
3 shallots
4 cloves garlic
6 dried chili, boiled to soft
1 inch glangal/blue ginger
1 stick lemongrass, take the white part
100ml cooking oil
2 inch turmeric root or (2 tspn turmeric powder)
(blend everything into puree)
Method :
(1) preheat wok with 1 tablespoon of cooking oil, stir in blended paste and cook till fragrant or pecah minyak.
(2) next, add in coconut milk, kaffir leaves, turmeric leaf, kerisik kelapa, sugar & salt, cook over medium heat till slightly dried.
(3) now, add in prawns and stir gradually till cooked thoroughly and slightly dried.
(4) Finally, serve with thinly sliced turmeric leaf on top.

This is another version of taro balls that I am working with, unlike the common taro ball called "wu kok'. 'Wu kok' has 5 spice aroma and with the hairy outstanding crust and savory fillings. But this version of taro ball is in a very clean flavour, which is sweet and salty and cheesy at the same time. Kind of melting you away.....
haha...... Please read on for more.
Note for my dearest readers : For further enquiry, kindly email directly to me. Thank you.
When you are in the market, go look for taro that is around 530gm cause after all the cutting and cleaning it will became 400gm something.
Ingredients :
400-420gm taro (after cleaning)
80gm sugar
1/2 tspn salt
1 TB cooking oil
4 TB wheat starch
**200gm mozerella cheese, grated
Method :
(1) wash & skinned the taro, then slice it into small portions.
(2) next, steam for 25 minutes or till soft.
(2) once its ready, transfer steamed taro to a mixing bowl then mashed into puree.
(3) now, add in sugar & salt and mix well then stir in cooking oil till well cooperated.
(4) next, add in wheat starch and knead till soft dough is form.
(5) once its done, divide dough by using an ice cream scoop. You will get around 10 portions.
(6) now, stuff in grated cheese and seal nicely.
(7) finally, cover all filled taro balls with wheat starch and coat it with water, and throw them to bread crumb till well coated.
The taro ball will looks like this after coated with bread crumbs.
Finally, deep fried with high heat at the beginning then lower the heat once it started to brown.
Olala。。。。here comes the baby ! Looks so good, is it !
And not forgetting the cheesy filling too ! Oh man, looks incredibly yummy.

My first attempt making this ayam berempah @
malay spicy chicken with less oil version. This is an extremely delicious chicken dish full of aromatic spices. Normally, I would buy this ayam berempah from Pasar pagi @
morning market once a week. But it happened that the stall owner doesn't open shop often, so I decided to make my own. And it such a blessing that it turns out yummy. My girl just love it. Please read on for more.
Note to all my readers : Please feel free to drop me an email if you've any questions. Thank you.
Ingredients :
5 chicken wings
salt to taste
2 stalk lemongrass (upper part), cut in 1/2" length
2 tspn curry powder
1/2 tspn cumin powder
1/2 tspn fennel powder
1/2 tspn coriander powder
handful of curry leaves, washed
Ingredients for
blended paste :
4 shallots
1" galangal/blue ginger
4 clove garlic
3 lemongrass only the bottom white part
5 dried chilies, cook to soften
Method :
(1) pound cut lemongrass with a pestle till turns into fine shreds.
(2) heat up the blend ingredients with 3 tablespoon of cooking oil till fragrant, then puree it into paste.
(3) combine blended paste, curry powder, cumin powder, coriander powder & curry powder together and mix till well cooperated.
(4) marinade chicken with salt then set aside for 15 minutes, then rub in blended mix paste, curry leaves and pounded lemongrass. Leave to rest for 2 hours but its best overnight.
(5) when ready, arrange to air fryer with a baking paper lined below. And bake at 200'C 30 minutes then turn it around and bake at 195'C for another 25 minutes.
If your chicken wings turned out very light in colour then it is not ready yet ! Put it back to air fryer and bake for another few more minutes. Unlike the BBQ chicken wings which easily cooked. The colour should be much darker than this one here.


%20combine%20flour,%20baking%20soda%20%26amp;%20salt%20into%20a%20big%20bowl,%20mix%20well%20then%20add%20in%20fermented%20beancurd%20and%20cooking%20oil%20and%20stir%20with%20hand%20till%20cooperated%20or%20turns%20into%20crumb%20like%20texture.%3C/div%3E%3Cdiv%3E(2)%20next,%20add%20in%20water%20and%20stir%20till%20soft%20dough%20is%20formed.%20Then%20set%20aside%20to%20rest%20for%204%20hours.%20%3Cbr%20/%3E%3C/div%3E%3Cdiv%3E%3Cbr%20/%3E%3C/div%3E%3Cdiv%3E%3Ca%20href%3D%22https://blogger.googleusercontent.com/img/b/R29vZ2xl/AVvXsEjaWNLrsPFnNoygBona_k3PiX7V33dTRWJsvmApG3EOTRHzxLaJf38SfET3HG-g4bei_LwvrX56Q-R1FoE417XTSG1kxF6wBKksfMj54OvmRY3UyO64NBOBv_fGu2wQX4OlapZrWwcoMMaR/s640/LS+3.jpg%22%20imageanchor%3D%221%22%3E%3Cimg%20border%3D%220%22%20data-original-height%3D%22640%22%20data-original-width%3D%22480%22%20height%3D%22640%22%20src%3D%22https://blogger.googleusercontent.com/img/b/R29vZ2xl/AVvXsEjaWNLrsPFnNoygBona_k3PiX7V33dTRWJsvmApG3EOTRHzxLaJf38SfET3HG-g4bei_LwvrX56Q-R1FoE417XTSG1kxF6wBKksfMj54OvmRY3UyO64NBOBv_fGu2wQX4OlapZrWwcoMMaR/w480-h640/LS+3.jpg%22%20width%3D%22480%22%20/%3E%3C/a%3E%3C/div%3E%3Cp%3E%3C/p%3E%3Cdiv%3E(3)%26nbsp;%20when%20dough%20is%20ready,%20dust%20working%20table%20with%20flour%20and%20flatten%20dough%20with%20rolling%20pin%20till%20as%20thin%20as%20possible.%3C/div%3E%3Cdiv%3E%26nbsp;%3C/div%3E%3Cdiv%3E%3Ca%20href%3D%22https://blogger.googleusercontent.com/img/b/R29vZ2xl/AVvXsEjkNBweJQNDPo_GP-gWc0keCU2gozM3_tDHV1J-ofWaSHvRkWzaBh9phOPAI4u1XpUezxkJ8L4RjCu2mdL3iQ3UYVsWr7flabOsuCHmleqOqzHkMtrkRbczdfc0FEQLV0v2Qk8LDrcijBzJ/s640/LS+4.jpg%22%20imageanchor%3D%221%22%3E%3Cimg%20border%3D%220%22%20data-original-height%3D%22640%22%20data-original-width%3D%22480%22%20height%3D%22640%22%20src%3D%22https://blogger.googleusercontent.com/img/b/R29vZ2xl/AVvXsEjkNBweJQNDPo_GP-gWc0keCU2gozM3_tDHV1J-ofWaSHvRkWzaBh9phOPAI4u1XpUezxkJ8L4RjCu2mdL3iQ3UYVsWr7flabOsuCHmleqOqzHkMtrkRbczdfc0FEQLV0v2Qk8LDrcijBzJ/w480-h640/LS+4.jpg%22%20width%3D%22480%22%20/%3E%3C/a%3E%3C/div%3E%3Cp%3E%3C/p%3E%3Cdiv%3E(4)%26nbsp;%20now,%20cut%20dough%20sheet%20into%20thin%20strips.%3C/div%3E%3Cdiv%3E%3Cbr%20/%3E%3C/div%3E%3Cdiv%3E%3Ca%20href%3D%22https://blogger.googleusercontent.com/img/b/R29vZ2xl/AVvXsEjKQeuh9envLWNACSu9yAcV86NbByGzcmcfXqkDLBOouFK1tULA3OTC0Rfl3Xb1YgVxUC9MbFPgB8YxsfurOY-J3pTH0uACq4ZEAGzUpelAhCCPCGPlV6AOmvVuo1AGsTUh4mV0BQyHyKED/s640/LS+5.jpg%22%20imageanchor%3D%221%22%3E%3Cimg%20border%3D%220%22%20data-original-height%3D%22640%22%20data-original-width%3D%22480%22%20height%3D%22640%22%20src%3D%22https://blogger.googleusercontent.com/img/b/R29vZ2xl/AVvXsEjKQeuh9envLWNACSu9yAcV86NbByGzcmcfXqkDLBOouFK1tULA3OTC0Rfl3Xb1YgVxUC9MbFPgB8YxsfurOY-J3pTH0uACq4ZEAGzUpelAhCCPCGPlV6AOmvVuo1AGsTUh4mV0BQyHyKED/w480-h640/LS+5.jpg%22%20width%3D%22480%22%20/%3E%3C/a%3E%3C/div%3E%3Cp%3E%3C/p%3E%3Cdiv%3E(5)%26nbsp;%20finally,%20fry%20till%20golden%20over%20medium%20heat.%3Cbr%20/%3E%3C/div%3E%3Cdiv%3E%3Cbr%20/%3E%3C/div%3E%3Cdiv%3E%3Ca%20href%3D%22https://blogger.googleusercontent.com/img/b/R29vZ2xl/AVvXsEjcQ04_tISgECrkGcmPehXk8jcwBvcYJDFlfW-V_6omwzNM0KyvNsZSqSLJNL0u85utNNMVqAlue2MsbW0bxXm_f6heaf8AAAHqwqKBf2fR8K7YxzshcHS9t2VtIq26rw5aqKcKRJFFu1s8/s640/LS+2.jpg%22%20imageanchor%3D%221%22%3E%3Cimg%20border%3D%220%22%20data-original-height%3D%22640%22%20data-original-width%3D%22480%22%20height%3D%22640%22%20src%3D%22https://blogger.googleusercontent.com/img/b/R29vZ2xl/AVvXsEjcQ04_tISgECrkGcmPehXk8jcwBvcYJDFlfW-V_6omwzNM0KyvNsZSqSLJNL0u85utNNMVqAlue2MsbW0bxXm_f6heaf8AAAHqwqKBf2fR8K7YxzshcHS9t2VtIq26rw5aqKcKRJFFu1s8/w480-h640/LS+2.jpg%22%20width%3D%22480%22%20/%3E%3C/a%3E%3C/div%3E%3Cp%3E%3C/p%3E%3Cp%3EAfter%20done%20leave%20cool%20completely%20before%20storage.%3Cbr%20/%3E%3C/p%3E%3Cdiv%3E%3Ca%20href%3D%22https://blogger.googleusercontent.com/img/b/R29vZ2xl/AVvXsEhCJyUDuPMAxH9EUiY-nCiiIUHXqPLezyOeIqWqLtPbPVhvN8278Unf-QiMNWtpNStQvFXBPXrjlu8vNtsYEoTHqcdzHrtxOvurRaGbvNfQlPc3j7o3mmIsYyu5DlOnAjAFD7WucSIXdTOF/s2048/LS+6.jpg%22%20imageanchor%3D%221%22%3E%3Cimg%20border%3D%220%22%20data-original-height%3D%222048%22%20data-original-width%3D%221536%22%20height%3D%22640%22%20src%3D%22https://blogger.googleusercontent.com/img/b/R29vZ2xl/AVvXsEhCJyUDuPMAxH9EUiY-nCiiIUHXqPLezyOeIqWqLtPbPVhvN8278Unf-QiMNWtpNStQvFXBPXrjlu8vNtsYEoTHqcdzHrtxOvurRaGbvNfQlPc3j7o3mmIsYyu5DlOnAjAFD7WucSIXdTOF/w480-h640/LS+6.jpg%22%20width%3D%22480%22%20/%3E%3C/a%3E%3C/div%3E%3Cp%3E%3C/p%3E%3Cp%3EThe%20result%20is%20really%20satisfying.%20Just%20look%20at%20the%20bubbles%20formed%20in%20the%20crackers.%3C/p%3E%3Cdiv%3E%3Ca%20href%3D%22https://blogger.googleusercontent.com/img/b/R29vZ2xl/AVvXsEgFloGYyvxuNdjM0WYrFsmhUX8fR_7vkNp9HC1uDqqpi-8d8Hn95A9tYVHkK8gFXUTv86srPUcIY55OJmqH9o3Lci_i2s5ZbWZWUyh3akgAHN-p4mnpfHySPzTjoypRGrCr8ky3CI6crQKX/s640/LS+8.jpg%22%20imageanchor%3D%221%22%3E%3Cimg%20border%3D%220%22%20data-original-height%3D%22640%22%20data-original-width%3D%22480%22%20height%3D%22640%22%20src%3D%22https://blogger.googleusercontent.com/img/b/R29vZ2xl/AVvXsEgFloGYyvxuNdjM0WYrFsmhUX8fR_7vkNp9HC1uDqqpi-8d8Hn95A9tYVHkK8gFXUTv86srPUcIY55OJmqH9o3Lci_i2s5ZbWZWUyh3akgAHN-p4mnpfHySPzTjoypRGrCr8ky3CI6crQKX/w480-h640/LS+8.jpg%22%20width%3D%22480%22%20/%3E%3C/a%3E%3C/div%3E%3Cp%3EI%20divide%20them%20into%202%20portions%20easier%20for%20later%20use.%20Each%20portions%20can%20serve%20a%20lou%20sang%20for%204-6%20persons.%20Good%20enough.%20Hope%20you%20guys%20will%20like%20it%20too.%20Have%20fun%20!%3Cbr%20/%3E%3C/p%3E)


%3C/div%3E%3Cdiv%3E%3Cbr%20/%3E%3Cdiv%3E%3Cdiv%3E%3Cdiv%3E%3Ca%20href%3D%22https://blogger.googleusercontent.com/img/b/R29vZ2xl/AVvXsEgpBoMcok9Xx6yOM60QX6VNnoZidltRQKFbcNDLDKR0x2t89OrpbgZysY23IuI4x6qVCWgKuoxtR5_cTCdAqn3I_YKefHofQ7b4ED5SHGgFUw5wXCtqjhwC3ePM7-n-CEyuJ5bfqTD-Ovkm/s640/Hakka+SC+2.jpg%22%3E%3Cimg%20border%3D%220%22%20data-original-height%3D%22640%22%20data-original-width%3D%22480%22%20height%3D%22640%22%20src%3D%22https://blogger.googleusercontent.com/img/b/R29vZ2xl/AVvXsEgpBoMcok9Xx6yOM60QX6VNnoZidltRQKFbcNDLDKR0x2t89OrpbgZysY23IuI4x6qVCWgKuoxtR5_cTCdAqn3I_YKefHofQ7b4ED5SHGgFUw5wXCtqjhwC3ePM7-n-CEyuJ5bfqTD-Ovkm/w480-h640/Hakka+SC+2.jpg%22%20width%3D%22480%22%20/%3E%3C/a%3E%3C/div%3ESTEP%202%20:%26nbsp;%20Rub%20chicken%20with%20salt%20immediately%20after%20out%20of%20the%20soup%20pot.%20So%20that%20the%20salt%20will%20easily%20melt%20%26amp;%20stick%20to%20the%20surface%20of%20the%20skin%20after%20cool.%20Next,%20after%20cooling%20down%20rub%20chicken%20with%20a%20bit%20of%20light%20soy%20sauce%20and%20then%20steam%20for%2010%20minutes%20over%20medium%20heat%20for%20whole%20leg%20only%20and%20high%20heat%20for%20whole%20chicken.%20Off%20the%20heat%20then%20only%20bring%20out%20the%20chicken%2020%20minutes%20later.%20This%20will%20give%20time%20for%20the%20salt%20to%20do%20its%20work.%3C/div%3E%3Cdiv%3ENote%20:%26nbsp;%20for%20leftover%20chicken%20meat,%20rub%20all%20chicken%20with%20salt%20then%20go%20straight%20to%20steamer.%20Adjust%20the%20quantity%20of%20salt%20according%20the%20leftover%20meat.%20Then%20can%20keep%20in%20the%20fridge%20after%20cooled.%3C/div%3E%3Cdiv%3E***%20for%202%20whole%20chicken%20leg%20~%202.5%20tspn%20of%20salt%20or%20adjust%20as%20your%20own%20preference%20but%20the%20more%20the%20merrier.%3C/div%3E%3Cdiv%3E***%20for%20one%20whole%20chicken%20~%20roughly%20about%201%20TB%20or%20more%20salt%20(1.8kg%20chicken)%20need%20to%20rub%20inner%20core%20as%20well.%3C/div%3E%3Cdiv%3E%3Cbr%20/%3E%3Cdiv%3E%3Ca%20href%3D%22https://blogger.googleusercontent.com/img/b/R29vZ2xl/AVvXsEgqWXq-zAzSg9XkR7l7IGj_uV468251d6mt8oV3Xta8RxIU0QersUozHS-eP1oEDaIQJmepJ1aNz1RUQ-v_hRbYBzQVJpFVuYoD1_-prSDtpAA7LYJzdbfl0hH5YYqgsGarfQZDf-K0oeut/s640/Hakka+SC+3.jpg%22%3E%3Cimg%20border%3D%220%22%20data-original-height%3D%22640%22%20data-original-width%3D%22480%22%20height%3D%22640%22%20src%3D%22https://blogger.googleusercontent.com/img/b/R29vZ2xl/AVvXsEgqWXq-zAzSg9XkR7l7IGj_uV468251d6mt8oV3Xta8RxIU0QersUozHS-eP1oEDaIQJmepJ1aNz1RUQ-v_hRbYBzQVJpFVuYoD1_-prSDtpAA7LYJzdbfl0hH5YYqgsGarfQZDf-K0oeut/w480-h640/Hakka+SC+3.jpg%22%20width%3D%22480%22%20/%3E%3C/a%3E%3C/div%3ESTEP%203%20:%20Let%20chicken%20totally%20cool%20and%20you%20can%20either%20wrap%20it%20up%20for%20storage.%20Best%20to%20keep%20in%20freezer%20or%20fridge.%20Keep%20the%20chicken%20stock%20as%20well.%20It%20tastes%20superb.%3C/div%3E%3Cdiv%3E%3Cbr%20/%3E%3Cdiv%3E%3Ca%20href%3D%22https://blogger.googleusercontent.com/img/b/R29vZ2xl/AVvXsEjBFS6YzAL0j1pGGLoFojaSYw3882C3Z48N18uWjX_oFKbhFL29Lp-48snJksFVsk0AE6e_9xWyCCVlthw9QP8dVEmYJBZr8EGlS_xoHlnejrBzI7bhXBH7xbHcOkSk8pi6vssIkJCZmkG4/s640/Hakka+SC+5.jpg%22%3E%3Cimg%20border%3D%220%22%20data-original-height%3D%22640%22%20data-original-width%3D%22480%22%20height%3D%22640%22%20src%3D%22https://blogger.googleusercontent.com/img/b/R29vZ2xl/AVvXsEjBFS6YzAL0j1pGGLoFojaSYw3882C3Z48N18uWjX_oFKbhFL29Lp-48snJksFVsk0AE6e_9xWyCCVlthw9QP8dVEmYJBZr8EGlS_xoHlnejrBzI7bhXBH7xbHcOkSk8pi6vssIkJCZmkG4/w480-h640/Hakka+SC+5.jpg%22%20width%3D%22480%22%20/%3E%3C/a%3E%3C/div%3ESTEP%204%20:%26nbsp;%20For%20serving,%20just%20chop%20the%20chicken%20into%20small%20pieces%20and%20add%20in%20the%20stock.%20Again%20steam%20for%2015%20minutes%20over%20high%20heat%20before%20serving.%20At%20this%20stage,%20you%20can%20actually%20smell%20the%20difference.%20Something%20like%20wax%20duck.%20Super%20duper%20tempting.%20Hope%20you%20will%20like%20it%20too%20!%20Enjoy.%3C/div%3E%3C/div%3E%3C/div%3E)


%3Cbr%20/%3E%0A%3Cu%3EPortion%20A%3C/u%3E%3Cbr%20/%3E%0A7%20egg%20yolk%3Cbr%20/%3E%0A1%20egg%3Cbr%20/%3E%0A70ml%26nbsp;%20corn%20oil/melted%20butter%3Cbr%20/%3E%0A120gm%26nbsp;%20mashed%20banana%3Cbr%20/%3E%0A110gm%26nbsp;%20all%20purpose%20flour%3Cbr%20/%3E%0A1/4%20tspn%26nbsp;%20salt%3Cbr%20/%3E%0A%3Cbr%20/%3E%0A%3Cu%3EPortion%20B%3C/u%3E%3Cbr%20/%3E%0A7%20egg%20white%3Cbr%20/%3E%0A100gm%26nbsp;%20fine%20sugar%3Cbr%20/%3E%0A1/4%20tspn%26nbsp;%20cream%20of%20tartar%3Cbr%20/%3E%0A%3Cbr%20/%3E%0A%3Cu%3EPortion%20C%3C/u%3E%3Cbr%20/%3E%0A1%20tspn%26nbsp;%20chacoal%20powder%3Cbr%20/%3E%0A1-1/2%20tspn%26nbsp;%20hot%20water%3Cbr%20/%3E%0A(mix%20well%20and%20set%20aside)%3Cbr%20/%3E%0A%3Cbr%20/%3E%0A%3Cb%3EMethod%20:%3C/b%3E%3Cbr%20/%3E%0A(1)%26nbsp;%20Portion%20A%20:%20beat%20eggs%20till%20pail%20%26amp;%20fluffy%20then%20add%20in%20mashed%20banana,%20salt%20%26amp;%20oil%20and%20beat%20till%20well%20combined.%3Cbr%20/%3E%0A(2)%26nbsp;%20now,%20fold%20in%20flour%20and%20beat%20till%20well%20cooperated%20and%20set%20aside.%3Cbr%20/%3E%0A(3)%26nbsp;%20Portion%20B%20:%26nbsp;%20whisk%20egg%20white%20till%20foamy%20then%20add%20in%20cream%20of%20tartar%20and%20continue%20whisking%20for%20about%201%20minute.%3Cbr%20/%3E%0A(4)%26nbsp;%20next,%20add%20in%20sugar%201/3%20at%20a%20time%20about%202%20minutes%20each%20batch%20till%20egg%20white%20became%20stiff%20and%20meringue%20like.%3Cbr%20/%3E%0A(5)%26nbsp;%20now,%20transfer%20egg%20white%20to%20Portion%20A%20in%20three%20batches%20and%20stir%20till%20well%20combined.%20Do%20not%20beat%20the%20mixture,%20as%20this%20will%20create%20more%20air%20in%20batter.%3Cbr%20/%3E%0A(6)%26nbsp;%20then%20divide%20batter%20into%202%20portions%20in%20separated%20bowl.%3Cbr%20/%3E%0A(7)%26nbsp;%20add%20Portion%20C%20to%20one%20portion%20of%20batter%20and%20mix%20till%20well%20cooperated.%3Cbr%20/%3E%0A(8)%26nbsp;%20finally,%26nbsp;%20alternately%20pour%20in%20both%20batter%20in%20equal%20portions%20to%20a%208%22%20tray%20lined%20with%20baking%20paper,%20with%20the%20side%20coated%20with%20butter.%20(I%20used%202%20medium%20size%20soup%20paddle)%3Cbr%20/%3E%0A(9)%26nbsp;%20and%20then%20bake%20at%20preheated%20oven%20160'C%20under%20water%20bath%20method,%20for%20about%2070%20minutes%20or%20till%20tester%20came%20out%20clean.%3Cbr%20/%3E%0A%3Cbr%20/%3E%0A%3Cdiv%3E%0A%3Ca%20href%3D%22https://blogger.googleusercontent.com/img/b/R29vZ2xl/AVvXsEj3ZVfB6v1TGTuHONBEXoSN-vUZFJEAcmtVRiUP9WlkkgYSXzEuiyP6R1il9w31OqnHrJt01NOf40E29PU6NX5PJcDnFv4e-yp4l2ioRi8L-KuRq-hIc5D2qsp8YUI6cRoAK92ZOytvZvPk/s1600/Banana+zebra+cake+2.jpg%22%20imageanchor%3D%221%22%3E%3Cimg%20border%3D%220%22%20data-original-height%3D%22640%22%20data-original-width%3D%22480%22%20height%3D%22640%22%20src%3D%22https://blogger.googleusercontent.com/img/b/R29vZ2xl/AVvXsEj3ZVfB6v1TGTuHONBEXoSN-vUZFJEAcmtVRiUP9WlkkgYSXzEuiyP6R1il9w31OqnHrJt01NOf40E29PU6NX5PJcDnFv4e-yp4l2ioRi8L-KuRq-hIc5D2qsp8YUI6cRoAK92ZOytvZvPk/s640/Banana+zebra+cake+2.jpg%22%20width%3D%22480%22%20/%3E%3C/a%3E%3C/div%3E%0ATips%20:%26nbsp;%20make%20sure%20you%20tap%20your%20baking%20tray%20on%20working%20table%20after%20each%20addition%20of%20batter,%20this%20will%20helps%20batter%20to%20spread%20and%20gives%20you%20better%20outcome.%3Cbr%20/%3E%0ATips%20:%26nbsp;%20water%20bath%20method%20meaning%20put%20the%20batter%20tray%20to%20a%20bigger%20tray%20filled%20with%20hot%20water%20on%20it.%20This%20is%20also%20called%20as%20steam%20bake%20method.%20After%2070%20minutes%20of%20baking%20time,%20mine%20is%20about%20to%20dry%20out.%3Cbr%20/%3E%0A%3Cbr%20/%3E%0A%3Cdiv%3E%0A%3Ca%20href%3D%22https://blogger.googleusercontent.com/img/b/R29vZ2xl/AVvXsEgL1CVJVvnbOqXxcPaXvAK-lHROxzkTYca-k77Ouk58yt7qgwLVKuN9ckWgmo2cEYhPX9VEfftxGfj0LNQ4YkCt3R9O3wm8YK02RRxEEqgJn9mOZqrwwp7R4jjoELNj-moYr-0nJVaJY6p3/s1600/Banana+zebra+cake+3.jpg%22%20imageanchor%3D%221%22%3E%3Cimg%20border%3D%220%22%20data-original-height%3D%22640%22%20data-original-width%3D%22480%22%20height%3D%22640%22%20src%3D%22https://blogger.googleusercontent.com/img/b/R29vZ2xl/AVvXsEgL1CVJVvnbOqXxcPaXvAK-lHROxzkTYca-k77Ouk58yt7qgwLVKuN9ckWgmo2cEYhPX9VEfftxGfj0LNQ4YkCt3R9O3wm8YK02RRxEEqgJn9mOZqrwwp7R4jjoELNj-moYr-0nJVaJY6p3/s640/Banana+zebra+cake+3.jpg%22%20width%3D%22480%22%20/%3E%3C/a%3E%3C/div%3E%0ALove%20how%20it%20turns%20out%20!%20The%20cake%20looks%20really%20tall%20and%20gorgeous.%3Cbr%20/%3E%0A%3Cbr%20/%3E%0A%3Cdiv%3E%0A%3Ca%20href%3D%22https://blogger.googleusercontent.com/img/b/R29vZ2xl/AVvXsEjzqWfgwqtLW4Ib9ETdQbe6rrvrh-9TXo9Z_9pFAOMDHNtxqFAifOXzdeQrFxEM91_X4vzJ-d0N_TFnM0mP4_gQKhw049flc082ODdWZhYRZRJxs1BXDHvVk7dEqMseZKsGt204I8VSZAJ_/s1600/Banana+zebra+cake+1.jpg%22%20imageanchor%3D%221%22%3E%3Cimg%20border%3D%220%22%20data-original-height%3D%22640%22%20data-original-width%3D%22480%22%20height%3D%22640%22%20src%3D%22https://blogger.googleusercontent.com/img/b/R29vZ2xl/AVvXsEjzqWfgwqtLW4Ib9ETdQbe6rrvrh-9TXo9Z_9pFAOMDHNtxqFAifOXzdeQrFxEM91_X4vzJ-d0N_TFnM0mP4_gQKhw049flc082ODdWZhYRZRJxs1BXDHvVk7dEqMseZKsGt204I8VSZAJ_/s640/Banana+zebra+cake+1.jpg%22%20width%3D%22480%22%20/%3E%3C/a%3E%3C/div%3E%0AAnd%20really%20fluffy%20%26amp;%20soft%20%26lt;3%20%26lt;3%20and%20smells%20really%20good%20too.%20No%20artificial%20essence%20or%20flavouring.%20wholely%20fresh%20banana......%20Loving%20it%20so%20much.)


%26nbsp;%20soaked%20kurma%20and%20sliced%20figs%20into%20boiling%20water%20for%20an%20hour%20or%20till%20softened,%20then%20puree%20it%20with%20blender.%3Cbr%20/%3E%0A(2)%26nbsp;%20beat%20butter%20and%20sugar%20till%20fluffy%20then%20beat%20together%20the%20kurma%20%26amp;%20fig%20puree%20till%20well%20mixed.%3Cbr%20/%3E%0A%3Cbr%20/%3E%0A%3Cdiv%3E%0A%3Ca%20href%3D%22https://blogger.googleusercontent.com/img/b/R29vZ2xl/AVvXsEhxmBJOLfyYhlQL-qQErlbYQ4DVPZlo7yBZGgUd8o88yaD7QClh0JJ5wbn7a1xJPb23AGXYydttCg18q97QgqKannhh_kluOwCPJHmnK_pzyTxP5v-GaL-JqtJiKCVYg8hX9Cq7l2qJf3ka/s1600/kurma+cake+1.jpg%22%20imageanchor%3D%221%22%3E%3Cimg%20border%3D%220%22%20data-original-height%3D%22640%22%20data-original-width%3D%22480%22%20height%3D%22640%22%20src%3D%22https://blogger.googleusercontent.com/img/b/R29vZ2xl/AVvXsEhxmBJOLfyYhlQL-qQErlbYQ4DVPZlo7yBZGgUd8o88yaD7QClh0JJ5wbn7a1xJPb23AGXYydttCg18q97QgqKannhh_kluOwCPJHmnK_pzyTxP5v-GaL-JqtJiKCVYg8hX9Cq7l2qJf3ka/s640/kurma+cake+1.jpg%22%20width%3D%22480%22%20/%3E%3C/a%3E%3C/div%3E%0A(3)%20next,%20beat%20in%20egg%20one%20at%20a%20time%20till%20well%20cooperated.%3Cbr%20/%3E%0A%3Cbr%20/%3E%0A%3Cdiv%3E%0A%3Ca%20href%3D%22https://blogger.googleusercontent.com/img/b/R29vZ2xl/AVvXsEj85CYktnBHVku9SyJ87_r-kYpDJ5W7967rZaTTgoQbefAmGj5LsOS97t0gMIc-rrfYrBftgOvACzdldcaPDoyh8hDzq7AePokqTnDekXH3m-XPle5DRu0Oxcoz3ClC9UczLR9YJD_nan90/s1600/kurma+cake+2.jpg%22%20imageanchor%3D%221%22%3E%3Cimg%20border%3D%220%22%20data-original-height%3D%22640%22%20data-original-width%3D%22480%22%20height%3D%22640%22%20src%3D%22https://blogger.googleusercontent.com/img/b/R29vZ2xl/AVvXsEj85CYktnBHVku9SyJ87_r-kYpDJ5W7967rZaTTgoQbefAmGj5LsOS97t0gMIc-rrfYrBftgOvACzdldcaPDoyh8hDzq7AePokqTnDekXH3m-XPle5DRu0Oxcoz3ClC9UczLR9YJD_nan90/s640/kurma+cake+2.jpg%22%20width%3D%22480%22%20/%3E%3C/a%3E%3C/div%3E%0A(4)%20now,%20stir%20in%20flour%20%26amp;%20baking%20soda%20till%20everything%20well%20combined.%3Cbr%20/%3E%0A%3Cbr%20/%3E%0A%3Cdiv%3E%0A%3Ca%20href%3D%22https://blogger.googleusercontent.com/img/b/R29vZ2xl/AVvXsEgegFvEqOIo4zw1eaqB6q3dsRV-kUfWrqhDilnsncOQLY0nFD8wpIJkrVi3H6d4bHFXAebL1K29YRc1p1rU6mzzKoBR936yGdor9Ajw_0KBh48tv_EOG8VAVA_45qMBqRH6mzMqgmzdIah4/s1600/kurma+cake+3.jpg%22%20imageanchor%3D%221%22%3E%3Cimg%20border%3D%220%22%20data-original-height%3D%22640%22%20data-original-width%3D%22480%22%20height%3D%22640%22%20src%3D%22https://blogger.googleusercontent.com/img/b/R29vZ2xl/AVvXsEgegFvEqOIo4zw1eaqB6q3dsRV-kUfWrqhDilnsncOQLY0nFD8wpIJkrVi3H6d4bHFXAebL1K29YRc1p1rU6mzzKoBR936yGdor9Ajw_0KBh48tv_EOG8VAVA_45qMBqRH6mzMqgmzdIah4/s640/kurma+cake+3.jpg%22%20width%3D%22480%22%20/%3E%3C/a%3E%3C/div%3E%0A(5)%26nbsp;%20transfer%20batter%20to%20a%208%22%20baking%20tray%20lined%20with%20greased%20proof%20paper%20at%20the%20bottom%20and%20flour%20coating%20on%20the%20side%20of%20tray.%20Then%20decorate%20the%20top%20with%26nbsp;%20pecan%20of%20walnut.%3Cbr%20/%3E%0A(6)%20finally,%20bake%20at%20preheated%20oven%20175'C%20for%20about%2060%20minutes%20or%20till%20tester%20came%20out%20clean.%3Cbr%20/%3E%0A%3Cbr%20/%3E%0A%3Cdiv%3E%0A%3Ca%20href%3D%22https://blogger.googleusercontent.com/img/b/R29vZ2xl/AVvXsEgkuldNe7EOCN67_z8bWyNmRnnPgVAAVj7ml0owIk0bse64c4mMCRg28uTBOK3l86yqu34IvSAvXT4GvIneg-VwGMpFYG8Zz81EUAdyODnAN-7YEddmU58nN7aKJlAgAqjRwvHzhZL0r6TV/s1600/kurma+cake+4.jpg%22%20imageanchor%3D%221%22%3E%3Cimg%20border%3D%220%22%20data-original-height%3D%22640%22%20data-original-width%3D%22480%22%20height%3D%22640%22%20src%3D%22https://blogger.googleusercontent.com/img/b/R29vZ2xl/AVvXsEgkuldNe7EOCN67_z8bWyNmRnnPgVAAVj7ml0owIk0bse64c4mMCRg28uTBOK3l86yqu34IvSAvXT4GvIneg-VwGMpFYG8Zz81EUAdyODnAN-7YEddmU58nN7aKJlAgAqjRwvHzhZL0r6TV/s640/kurma+cake+4.jpg%22%20width%3D%22480%22%20/%3E%3C/a%3E%3C/div%3E%0AThe%20cake%20turns%20out%20really%20moist%20%26amp;%20fluffy%20and%20so%20scrumptious.%20Quite%20addictive%20too%20!%20Bet%20you%20can't%20stop%20at%20one.%20My%20boy%20said%20much%20much%20more%20yummy%20than%20fruit%20cake,%20and%20not%20so%20sweet.%20%3Ci%3Ehaha....%3C/i%3E..%20Enjoy%20%26amp;%20Happy%20thanksgiving%20to%20all.)


%3Cbr%20/%3E%0A2%20cups%20%26nbsp;all%20purpose%20flour%3Cbr%20/%3E%0A2/3%20cup%26nbsp;%20sugar%20(I%20used%20brown%20sugar)%3Cbr%20/%3E%0A1/2%20tspn%20%26nbsp;baking%20powder%3Cbr%20/%3E%0A1/2%20tspn%20%26nbsp;baking%20soda%3Cbr%20/%3E%0Aa%20pinch%20of%20salt%3Cbr%20/%3E%0A230gm%20%26nbsp;cold%20butter,%20chopped%3Cbr%20/%3E%0A%3Cbr%20/%3E%0A(B)%3Cbr%20/%3E%0A3/4%20cup%20%26nbsp;heavy%20cream%3Cbr%20/%3E%0A1%20egg%3Cbr%20/%3E%0A1%20TB%20%26nbsp;lime%20juice%20%26amp;%20zest%3Cbr%20/%3E%0A1%20tspn%20%26nbsp;vanilla%20essence%3Cbr%20/%3E%0A%3Cbr%20/%3E%0A(C)%3Cbr%20/%3E%0A4%20green%20apple,%20diced%3Cbr%20/%3E%0A100gm%26nbsp;%20sugar%3Cbr%20/%3E%0A1%20tspn%26nbsp;%20cinnamon%20powder%3Cbr%20/%3E%0A3%20TB%26nbsp;%20%26nbsp;cornstarch%3Cbr%20/%3E%0A(combine%20all%20ingredients%20and%20cook%20till%20softened%20then%20set%20aside%20to%20leave%20cool)%3Cbr%20/%3E%0A%3Cbr%20/%3E%0A%3Cb%3EMethod%20:%3C/b%3E%3Cbr%20/%3E%0A(1)%20for%20ingredients%20(A),%20combine%20together%20flour,%20baking%20powder,%20baking%20soda,%20sugar%20%26amp;%20salt%20and%20mix%20well.%20Then%20rub%20in%20butter%20till%20everything%20well%20cooperated%20and%20reserved%20one%20cup%20for%20topping%20later%20on.%20The%20best%20is%20to%20keep%20the%20remaining%20mixture%20refrigerated.%3Cbr%20/%3E%0A%3Cbr%20/%3E%0A%3Cdiv%3E%0A%3Ca%20href%3D%22https://blogger.googleusercontent.com/img/b/R29vZ2xl/AVvXsEhoF3oVhc7W4MNqQ7X05_z7dhwNzKb4BIFaJQEd35YnAubC6MF6gpg2MEwabiIknnKfmE2YYf8h9sLTlGYUuPhZxBvTQaPObKHL1Mm_mKr0NVSrgps7b7ut_VyLUDa9kLPCLDnxU9VPtxvq/s1600/apple+crumble+1.jpg%22%20imageanchor%3D%221%22%3E%3Cimg%20border%3D%220%22%20data-original-height%3D%22640%22%20data-original-width%3D%22480%22%20height%3D%22640%22%20src%3D%22https://blogger.googleusercontent.com/img/b/R29vZ2xl/AVvXsEhoF3oVhc7W4MNqQ7X05_z7dhwNzKb4BIFaJQEd35YnAubC6MF6gpg2MEwabiIknnKfmE2YYf8h9sLTlGYUuPhZxBvTQaPObKHL1Mm_mKr0NVSrgps7b7ut_VyLUDa9kLPCLDnxU9VPtxvq/s640/apple+crumble+1.jpg%22%20width%3D%22480%22%20/%3E%3C/a%3E%3C/div%3E%0A%3Cbr%20/%3E%0A%3Cdiv%3E%0A%3Ca%20href%3D%22https://blogger.googleusercontent.com/img/b/R29vZ2xl/AVvXsEjMTinQaveIyr7EiiEBawQ3JZqLTX2ybr2m-Q9EUMZdT6e1ZPe87y54LLck3WcWtNIhlmf6Xy8-mzcnHLs8LIwrYyoJgDkNjYavFinIyGTEEpvCWXdWsmPPlg-PTuD_ESxj6OdsqRYHuAsT/s1600/72741036_937633219949056_8240144333630603264_n+%2525281%252529.jpg%22%20imageanchor%3D%221%22%3E%3Cimg%20border%3D%220%22%20data-original-height%3D%221600%22%20data-original-width%3D%221200%22%20height%3D%22640%22%20src%3D%22https://blogger.googleusercontent.com/img/b/R29vZ2xl/AVvXsEjMTinQaveIyr7EiiEBawQ3JZqLTX2ybr2m-Q9EUMZdT6e1ZPe87y54LLck3WcWtNIhlmf6Xy8-mzcnHLs8LIwrYyoJgDkNjYavFinIyGTEEpvCWXdWsmPPlg-PTuD_ESxj6OdsqRYHuAsT/s640/72741036_937633219949056_8240144333630603264_n+%2525281%252529.jpg%22%20width%3D%22480%22%20/%3E%3C/a%3E%3C/div%3E%0A(2)%20for%20ingredients%20(B),%20beat%20everything%20till%20well%20mix%20then%20fold%20into%20ingredient%20(A)%20mixture%20till%20everything%20well%20combined.%20The%20texture%20should%20be%20something%20like%20muffin%20mixture.%3Cbr%20/%3E%0A%3Cbr%20/%3E%0A%3Cdiv%3E%0A%3Ca%20href%3D%22https://blogger.googleusercontent.com/img/b/R29vZ2xl/AVvXsEiEtB7kHXaTMij1-ISZdRrNRU02GLdF9O67-ULmIm5cWZcq4OMj4k97CDD1TOcS0WxKC30i_qPdD3aP_hZZinAOWCTxmvqbiGV9Gj7KaBRtFVPXtkuymQodQBqzi8JCOgZcqWE_t2QcPVgc/s1600/apple+crumble+3.jpg%22%20imageanchor%3D%221%22%3E%3Cimg%20border%3D%220%22%20data-original-height%3D%22640%22%20data-original-width%3D%22480%22%20height%3D%22640%22%20src%3D%22https://blogger.googleusercontent.com/img/b/R29vZ2xl/AVvXsEiEtB7kHXaTMij1-ISZdRrNRU02GLdF9O67-ULmIm5cWZcq4OMj4k97CDD1TOcS0WxKC30i_qPdD3aP_hZZinAOWCTxmvqbiGV9Gj7KaBRtFVPXtkuymQodQBqzi8JCOgZcqWE_t2QcPVgc/s640/apple+crumble+3.jpg%22%20width%3D%22480%22%20/%3E%3C/a%3E%3C/div%3E%0A%3Cbr%20/%3E%0A%3Cdiv%3E%0A%3Ca%20href%3D%22https://blogger.googleusercontent.com/img/b/R29vZ2xl/AVvXsEgzXgaF4r9kx016C6FlVF8DR8_vEOMUCw8bIqJwCU-T7asuf7-imJRvfceunsmmhxiu0CQFOeITExkXFUDYEpFTdMkcXj5qVaiHVDrFUWSO-r8zbBtl-dwPpAM-mujLAZgFu8tLYg4sgRuA/s1600/apple+crumble+7.jpg%22%20imageanchor%3D%221%22%3E%3Cimg%20border%3D%220%22%20data-original-height%3D%22640%22%20data-original-width%3D%22480%22%20height%3D%22640%22%20src%3D%22https://blogger.googleusercontent.com/img/b/R29vZ2xl/AVvXsEgzXgaF4r9kx016C6FlVF8DR8_vEOMUCw8bIqJwCU-T7asuf7-imJRvfceunsmmhxiu0CQFOeITExkXFUDYEpFTdMkcXj5qVaiHVDrFUWSO-r8zbBtl-dwPpAM-mujLAZgFu8tLYg4sgRuA/s640/apple+crumble+7.jpg%22%20width%3D%22480%22%20/%3E%3C/a%3E%3C/div%3E%0A(3)%20place%20batter%20into%20a%207%22%20tray%20pan%20lined%20with%20parchment%20paper.%3Cbr%20/%3E%0A(4)%20next,%20spread%20ingredient%20(C)%20all%20over%20the%20top%20of%20the%20cake%20batter.%3Cbr%20/%3E%0A%3Cbr%20/%3E%0A%3Cdiv%3E%0A%3Ca%20href%3D%22https://blogger.googleusercontent.com/img/b/R29vZ2xl/AVvXsEirCH9lHqdOLjuQ-j8EhoRCXiocUdUjr8z-sGzN846e13tFRe7qZ5l7Jg0jRusQ-qETtNGACWgLtICoFqI4M6BpySnMjxeH6cy6wrfIWX7eFuvXyuJKXKfPN7wDnrbKis-8XPNioKY-EqFL/s1600/apple+crumble+6.jpg%22%20imageanchor%3D%221%22%3E%3Cimg%20border%3D%220%22%20data-original-height%3D%22640%22%20data-original-width%3D%22480%22%20height%3D%22640%22%20src%3D%22https://blogger.googleusercontent.com/img/b/R29vZ2xl/AVvXsEirCH9lHqdOLjuQ-j8EhoRCXiocUdUjr8z-sGzN846e13tFRe7qZ5l7Jg0jRusQ-qETtNGACWgLtICoFqI4M6BpySnMjxeH6cy6wrfIWX7eFuvXyuJKXKfPN7wDnrbKis-8XPNioKY-EqFL/s640/apple+crumble+6.jpg%22%20width%3D%22480%22%20/%3E%3C/a%3E%3C/div%3E%0A(5)%20then%20top%20with%20the%20remaining%20crumble%20mixture%20of%20ingredient%20(A).%3Cbr%20/%3E%0A(6)%20finally,%20bake%20at%20preheated%20oven%20175'C%20for%20about%2055%20minutes.%20The%20top%20crust%20should%20be%20in%20nice%20golden%20brown%20colour.%3Cbr%20/%3E%0A%3Cbr%20/%3E%0A%3Cdiv%3E%0A%3Ca%20href%3D%22https://blogger.googleusercontent.com/img/b/R29vZ2xl/AVvXsEhoB_B1_T0tbjct25cRj_8TcxLscVxfZjzf3dXPSAbAy8iMyE0h7MxsECggR8UXGov-86ltE5e5chyphenhyphenJ9uM2O_SVtaYB1CbrTBzDYoEA8JUDQ2_-0GQN3nFL2BCP9MEkktOU6G4tKBgXCfKs/s1600/apple+crumble+5.jpg%22%20imageanchor%3D%221%22%3E%3Cimg%20border%3D%220%22%20data-original-height%3D%22640%22%20data-original-width%3D%22480%22%20height%3D%22640%22%20src%3D%22https://blogger.googleusercontent.com/img/b/R29vZ2xl/AVvXsEhoB_B1_T0tbjct25cRj_8TcxLscVxfZjzf3dXPSAbAy8iMyE0h7MxsECggR8UXGov-86ltE5e5chyphenhyphenJ9uM2O_SVtaYB1CbrTBzDYoEA8JUDQ2_-0GQN3nFL2BCP9MEkktOU6G4tKBgXCfKs/s640/apple+crumble+5.jpg%22%20width%3D%22480%22%20/%3E%3C/a%3E%3C/div%3E%0AOh....%20here%20comes%20my%20baby%20!%20So%20yummy....%20hope%20you%20will%20love%20it%20too.)


,%20sliced%3Cbr%20/%3E%0A5%20cloves%26nbsp;%20garlic%3Cbr%20/%3E%0A3%20stalk%26nbsp;%20%26nbsp;lemongrass,%20take%20only%20the%20white%20part%20%26amp;%20sliced%3Cbr%20/%3E%0A1/2%22%20toasted%20Belacan%3Cbr%20/%3E%0A2%20tspn%26nbsp;%20asam%20paste%20(Adabi%20asam%20paste)%3Cbr%20/%3E%0Asome%20water%3Cbr%20/%3E%0Asalt%20to%20taste%3Cbr%20/%3E%0A1%20tspn%26nbsp;%20granules%3Cbr%20/%3E%0A1-1/2%20cup%26nbsp;%20%26nbsp;cooking%20oil%3Cbr%20/%3E%0A2%20TB%26nbsp;%20gula%20melaka/brown%20sugar%3Cbr%20/%3E%0A%3Cbr%20/%3E%0A%3Cb%3EMethod%20:%3C/b%3E%3Cbr%20/%3E%0A(1)%26nbsp;%20after%20cut%20and%20washing%20dried%20chilies,%20then%20cook%20it%20over%20medium%20heat%20till%20soft%20about%2015%20minutes.%20Discharge%20chilies%20from%20hot%20water%20to%20reduce%20the%20seeds%20from%20going%20together.%3Cbr%20/%3E%0A(2)%26nbsp;%20next,%20blend%20dried%20chilies,%20red%20chilies,%20shallots,%20garlic%20%26amp;%20lemongrass%20with%20some%20water%20into%20paste.%3Cbr%20/%3E%0A(3)%26nbsp;%20now,%20heat%20up%20work%20with%20cooking%20oil%20and%20cook%20blended%20paste%20over%20medium%20heat.%3Cbr%20/%3E%0A(4)%26nbsp;%20while%20the%20mixture%20starts%20bubbling,%20add%20in%20the%20salt%20to%20helps%20in%20putting%20away%20the%20unpleasant%20smell%20from%20the%20dried%20chilies.%20Continue%20cooking%20till%20you%20can%20see%20the%20separation%20between%20oil%20and%20mixture.%3Cbr%20/%3E%0A(5)%26nbsp;%20now,%20add%20in%20asam%20paste,%20belacan,%20gula%20melaka,%20granules%26nbsp;%20and%20some%20water,%20continue%20cooking%20over%20medium-low%20heat.%3Cbr%20/%3E%0A(6)%26nbsp;%20once%20the%20chili%20paste%20became%20thick%20%26amp;%20fragrant%20and%20you%20can%20clearly%20see%20the%20oil%20separation.%20That's%20mean%20it%20is%20ready.%3Cbr%20/%3E%0A(7)%26nbsp;%20off%20the%20heat%20and%20leave%20cool%20before%20bottling.%3Cbr%20/%3E%0A%3Cbr%20/%3E%0A%3Cdiv%3E%0A%3Ca%20href%3D%22https://blogger.googleusercontent.com/img/b/R29vZ2xl/AVvXsEg6na7ULOiEJT7-vJ9Z_iAoUR-lwlBsPYAeUyDBNtelE80J3WITYcmM11tGynBYklAmdCBufyYH50BOGrS9hHG4GdxU6l5z5dvdF3AT1JEjvwnCLdY_npolIFfSjQSyl6Sn34VDb-zwgx_x/s1600/sambal+4.jpg%22%20imageanchor%3D%221%22%3E%3Cimg%20border%3D%220%22%20data-original-height%3D%22640%22%20data-original-width%3D%22480%22%20height%3D%22640%22%20src%3D%22https://blogger.googleusercontent.com/img/b/R29vZ2xl/AVvXsEg6na7ULOiEJT7-vJ9Z_iAoUR-lwlBsPYAeUyDBNtelE80J3WITYcmM11tGynBYklAmdCBufyYH50BOGrS9hHG4GdxU6l5z5dvdF3AT1JEjvwnCLdY_npolIFfSjQSyl6Sn34VDb-zwgx_x/s640/sambal+4.jpg%22%20width%3D%22480%22%20/%3E%3C/a%3E%3C/div%3E%0AI%20love%20to%20make%20stir%20fried%20bihun%20or%20vermicelli%20with%20the%20leftover%20oil%20from%20the%20wok%20after%20preparing%20the%20sambal.%26nbsp;%20You%20may%20add%20a%20little%20more%20sambal%20to%20the%20bihun%20as%20personal%20preference%20%26amp;%20taste.%26nbsp;%20An%20extra%20lime%20juice%20or%20calamansi%20juice%20will%20definitely%20tempted%20me%20for%20more.%20Simply%20love%20it%20.....%20yummm.....)


%3C/div%3E%0A%3Cdiv%3E%0A3%20TB%26nbsp;%20olive%20oil%3C/div%3E%0A%3Cbr%20/%3E%0A**Fillings%20:%201%20stick%20black%20pepper%20sausage,%20chopped%20(for%20one%20bread%20roll)%3Cbr%20/%3E%0A**%20handful%20of%20spring%20onion,%20thinly%20sliced%20(for%20one%20bread%20roll)%3Cbr%20/%3E%0A%3Cbr%20/%3E%0A%3Cdiv%3E%0A*100gm%20%26nbsp;%20cheddar%20cheese%20block,%20grated%20finely%20for%20topping%3C/div%3E%0A%3Cdiv%3E%0A%3Cbr%20/%3E%0A%3Cb%3EMethod%20:%3C/b%3E%3C/div%3E%0A%3Cdiv%3E%0A(1)%20combine%20milk,%20sugar%20%26amp;%20yeast%20to%20rest%20for%205%20minutes%20or%20till%20bubbling.%3Cbr%20/%3E%0A(2)%26nbsp;%20now,%20mix%20both%20flour,%20cheese%20powder,%20milk%20mixture,%20salt%20%26amp;%20egg.%20into%20a%20large%20bowl%20and%20mix%20to%20form%20sticky%20dough.%3C/div%3E%0A%3Cdiv%3E%0A(2)%20%26nbsp;add%20in%20oil%20and%20continue%20kneading%20till%20smooth%20dough%20is%20formed,%20then%20leave%20to%20rest%20for%20an%20hour%20or%20till%20double%20in%20size.%3C/div%3E%0A%3Cdiv%3E%0A(3)%20%26nbsp;now,%20punch%20to%20release%20excess%20air%20and%20knead%20till%20smooth%20then%20divide%20into%202%20equal%20portions.%3Cbr%20/%3E%0A%3Cbr%20/%3E%0A%3Cdiv%3E%0A%3Ca%20href%3D%22https://blogger.googleusercontent.com/img/b/R29vZ2xl/AVvXsEgkEr3KYu4sYwWdG2I_UMVjD-DOx0noCfuek3ad6Vq88uUQwiA72N5ljTVPYjRjkEzuZNp0WBLl6H9tQDlGbwKlym2of4Q1eQQEMc7IcOPI0cSCQuhDI4JL3I5mt_EztzwzQcfoN8VbeVgb/s1600/Spring+onion+sausage+bread+1.jpg%22%20imageanchor%3D%221%22%3E%3Cimg%20border%3D%220%22%20data-original-height%3D%22640%22%20data-original-width%3D%22480%22%20height%3D%22640%22%20src%3D%22https://blogger.googleusercontent.com/img/b/R29vZ2xl/AVvXsEgkEr3KYu4sYwWdG2I_UMVjD-DOx0noCfuek3ad6Vq88uUQwiA72N5ljTVPYjRjkEzuZNp0WBLl6H9tQDlGbwKlym2of4Q1eQQEMc7IcOPI0cSCQuhDI4JL3I5mt_EztzwzQcfoN8VbeVgb/s640/Spring+onion+sausage+bread+1.jpg%22%20width%3D%22480%22%20/%3E%3C/a%3E%3C/div%3E%0A(4)%20%26nbsp;place%20dough%20to%20working%20table%20and%20flatten%20it%20into%208x12%22%20sheet%20then%20spread%20on%20spring%20onion%20%26amp;%20sausage.%3C/div%3E%0A%3Cdiv%3E%0A(5)%20%26nbsp;roll%20dough%20to%20form%20a%20swiss%20roll%20then%20place%20it%20to%20a%204x4x9%22%20tray%20lined%20with%20parchment%20paper.%3C/div%3E%0A%3Cdiv%3E%0A(6)%20%26nbsp;leave%20to%20rest%20for%2030-40%20minutes%20then%20brush%20the%20top%20with%20some%20butter%20and%20then%20spread%20on%20the%20grated%20cheese.%3Cbr%20/%3E%0A%3Cbr%20/%3E%0A%3Cdiv%3E%0A%3Ca%20href%3D%22https://blogger.googleusercontent.com/img/b/R29vZ2xl/AVvXsEi9XczrdGC0I_xiR4afZRm7TFbfM0rd3r0HRmvkHCB4pXgJpIPKou-FdYQ1oM72hfQ_FFMGRrBHAlM79CIcF38X1XKdZrRbCo8-TheMjcrKCKFCIs_XG-N5_li3VwBZQ0Q5sfhNv197bAdK/s1600/Spring+onion+sausage+bread+2.jpg%22%20imageanchor%3D%221%22%3E%3Cimg%20border%3D%220%22%20data-original-height%3D%22640%22%20data-original-width%3D%22480%22%20height%3D%22640%22%20src%3D%22https://blogger.googleusercontent.com/img/b/R29vZ2xl/AVvXsEi9XczrdGC0I_xiR4afZRm7TFbfM0rd3r0HRmvkHCB4pXgJpIPKou-FdYQ1oM72hfQ_FFMGRrBHAlM79CIcF38X1XKdZrRbCo8-TheMjcrKCKFCIs_XG-N5_li3VwBZQ0Q5sfhNv197bAdK/s640/Spring+onion+sausage+bread+2.jpg%22%20width%3D%22480%22%20/%3E%3C/a%3E%3C/div%3E%0A(7)%20%26nbsp;finally,%20bake%20at%20preheated%20oven%20185'C%20for%20about%2020-25%20minutes%20or%20till%20golden%20brown.%20(on%20lower%20rack)%3Cbr%20/%3E%0A%3Cdiv%3E%0A%3Ca%20href%3D%22https://blogger.googleusercontent.com/img/b/R29vZ2xl/AVvXsEitT3lST6ll95u20295pd6UxPnzCky9A2-l2JwCwIdoAc-ySUwEx8FXdnFgKcZXbyb-kX0P7DL2fIst0QhzWlw50Ud0Bn7cW8-cbCVLv_k6E5gr32q5rz774Qg9lQFDMbXhS7JfHp4UFejU/s1600/IMG_0544.jpg%22%20imageanchor%3D%221%22%3E%3Cimg%20border%3D%220%22%20data-original-height%3D%22448%22%20data-original-width%3D%22336%22%20height%3D%22640%22%20src%3D%22https://blogger.googleusercontent.com/img/b/R29vZ2xl/AVvXsEitT3lST6ll95u20295pd6UxPnzCky9A2-l2JwCwIdoAc-ySUwEx8FXdnFgKcZXbyb-kX0P7DL2fIst0QhzWlw50Ud0Bn7cW8-cbCVLv_k6E5gr32q5rz774Qg9lQFDMbXhS7JfHp4UFejU/s640/IMG_0544.jpg%22%20width%3D%22480%22%20/%3E%3C/a%3E%3C/div%3E%0AJust%20imagine%20how%20it%20smells%20!%26nbsp;%20Totally%20on%20cloud%209.%26nbsp;%20Bet%20you%20are%20going%20to%20make%20extra%20loaf.%3C/div%3E)


%3Cbr%20/%3E%0A%3Cbr%20/%3E%0A%3Cb%3EMethod%20:%3C/b%3E%3Cbr%20/%3E%0A(1)%26nbsp;%20place%20all%20dry%20ingredients%20into%20a%20big%20bowl%20and%20mix%20well.%3Cbr%20/%3E%0A(2)%26nbsp;%20next,%20stir%20in%20coffee,%20vanilla%20and%20mayonnaise%20mix%20till%20well%20cooperated.%3Cbr%20/%3E%0A(3)%26nbsp;%20transfer%20mixture%20to%20a%208%22%20silicon%20baking%20tray,%20greased.%3Cbr%20/%3E%0A(4)%26nbsp;%20then%20bake%20at%20preheated%20oven%20175'C%20for%20about%2045%20minutes%20to%2060%20minutes%20or%20till%20tester%20came%20out%20clean.%3Cbr%20/%3E%0A(5)%26nbsp;%20leave%20cool%20completely%20before%20frosting.%3Cbr%20/%3E%0A%3Cbr%20/%3E%0A%3Cdiv%3E%0A%3Ca%20href%3D%22https://blogger.googleusercontent.com/img/b/R29vZ2xl/AVvXsEgh2YQe9NEr5LAQVGPH0sAnAI1VIQSHUBFYmKClt1MjkNn6hgKYWI2d2Z_JMOafwpmU-VbaiadrOLy_bhoilXd6-B2HHY1SkLpgDKGCVvnfPbaYQIb3wkI__cm5Z4DrYwc-r99unqo7-OZ9/s1600/Eggless+mayo+coco+cake+2.jpg%22%20imageanchor%3D%221%22%3E%3Cimg%20border%3D%220%22%20data-original-height%3D%22640%22%20data-original-width%3D%22480%22%20height%3D%22640%22%20src%3D%22https://blogger.googleusercontent.com/img/b/R29vZ2xl/AVvXsEgh2YQe9NEr5LAQVGPH0sAnAI1VIQSHUBFYmKClt1MjkNn6hgKYWI2d2Z_JMOafwpmU-VbaiadrOLy_bhoilXd6-B2HHY1SkLpgDKGCVvnfPbaYQIb3wkI__cm5Z4DrYwc-r99unqo7-OZ9/s640/Eggless+mayo+coco+cake+2.jpg%22%20width%3D%22480%22%20/%3E%3C/a%3E%3C/div%3E%0AIngredients%20for%20%3Ci%3E%3Cb%3Echocolate%20ganache%3C/b%3E%3C/i%3E%20:%3Cbr%20/%3E%0A250gm%26nbsp;%20chocolate%20chips%3Cbr%20/%3E%0A170ml%26nbsp;%20%26nbsp;heavy%20cream%3Cbr%20/%3E%0A(cook%20heavy%20cream%20over%20low%20heat%20till%20bubbling,%20not%20boiling,%20then%20place%20in%20chocolate%20chips%20and%20off%20the%20heat.%20Leave%20it%20untouched%20for%205%20minutes.%20Then%20stir%20to%20well%20cooperated%20and%20finally%20spread%20over%20the%20cake)%3Cbr%20/%3E%0A%3Cbr%20/%3E)


%20Bottom%20Layer%3C/b%3E%3C/u%3E%3Cbr%20/%3E%0A500ml%26nbsp;%20water%3Cbr%20/%3E%0A145gm%26nbsp;%20sugar%3Cbr%20/%3E%0A300ml%26nbsp;%20thick%20coconut%20milk%3Cbr%20/%3E%0A10gm%26nbsp;%20agar-agar%20powder%3Cbr%20/%3E%0A1/3%20tspn%26nbsp;%20salt%3Cbr%20/%3E%0A400-500gm%26nbsp;%20chendol%3Cbr%20/%3E%0A*%201%20cup%20readymade%20Azuki%20beans%3Cbr%20/%3E%0A%3Cbr%20/%3E%0A%3Cu%3E%3Cb%3E(B)%26nbsp;%20Top%20Layer%3C/b%3E%3C/u%3E%3Cbr%20/%3E%0A500ml%26nbsp;%20water%3Cbr%20/%3E%0A160gm%26nbsp;%20palm%20sugar/brown%20sugar%20(50%25/50%25)%3Cbr%20/%3E%0A300ml%26nbsp;%20%26nbsp;thick%20coconut%20milk%3Cbr%20/%3E%0A10gm%26nbsp;%20%26nbsp;agar-agar%20powder%3Cbr%20/%3E%0A1/3%20tspn%26nbsp;%20salt%3Cbr%20/%3E%0A%3Cbr%20/%3E%0A%3Cb%3EMethod%20:%3C/b%3E%3Cbr%20/%3E%0A(1)%26nbsp;%20for%20ingredients%20(A),%20combine%20water,%20coconut%20milk,%20sugar,%20salt%20%26amp;%20agar-agar%20powder%20and%20bring%20it%20to%20boil%20or%20till%20sugar%20dissolved.%20Then%20switch%20to%20low%20heat%20and%20stir%20in%20the%20chendol.%20Let%20it%20simmer%20for%202%20second.%3Cbr%20/%3E%0A(2)%26nbsp;%20next,%20off%20the%20heat%20and%20transfer%20hat%20mixture%20to%20a%209x13%22%20tray%20or%2010x10%22%20tray.%3Cbr%20/%3E%0A(3)%26nbsp;%20finally,%26nbsp;%20spread%20azuki%20bean%20all%20around%20the%20hot%20mixture%20and%20let%20it%20cool%20to%20set.%3Cbr%20/%3E%0A(4)%26nbsp;%20now%20for%20ingredients%20(B),%20combine%20water,%20coconut%20milk,%20sugar,%20salt%20%26amp;%20agar-agar%20powder%20and%20bring%20it%20to%20boil%20or%20till%20sugar%20dissolved.%20Then%20off%20the%20heat.%3Cbr%20/%3E%0A(5)%26nbsp;%20before%20transferring%20ingredients%20(B)%20into%20(A),%20make%20sure%20you%20use%20a%20folk%20to%20make%20some%20scratches%20on%20the%20surface%20of%20the%20bottom%20layer,%20so%20that%20the%20top%20layer%20can%20join%20well%20together.%3Cbr%20/%3E%0A(6)%20now,%26nbsp;%20slowly%20pour%20the%20ingredients%20(B)%20to%20(A)%20and%20let%20it%20cool%20down%20till%20set.%3Cbr%20/%3E%0A(7)%20best%20to%20keep%20chill%20before%20serving.%3Cbr%20/%3E%0A%3Cbr%20/%3E%0A%3Cdiv%3E%0A%3Ca%20href%3D%22https://blogger.googleusercontent.com/img/b/R29vZ2xl/AVvXsEiiVdFqjsQBh1WQGnC1uxAYGd6FX01hi4VB-VbW3hIvZJqB06iny6YynkuVbd6hPkERWCnQlfs76M0HL1S2a9zBD4hZymu8ute3z48GviOtN5N3EJFuqTCyfFsSygqaSkLH9Kh3YzmUgR37/s1600/qwer.jpg%22%20imageanchor%3D%221%22%3E%3Cimg%20border%3D%220%22%20data-original-height%3D%22640%22%20data-original-width%3D%22480%22%20height%3D%22640%22%20src%3D%22https://blogger.googleusercontent.com/img/b/R29vZ2xl/AVvXsEiiVdFqjsQBh1WQGnC1uxAYGd6FX01hi4VB-VbW3hIvZJqB06iny6YynkuVbd6hPkERWCnQlfs76M0HL1S2a9zBD4hZymu8ute3z48GviOtN5N3EJFuqTCyfFsSygqaSkLH9Kh3YzmUgR37/s640/qwer.jpg%22%20width%3D%22480%22%20/%3E%3C/a%3E%3C/div%3E%0ANow,%20this%20is%20how%20it%20looks%20by%20using%20a%209x13%22%20tray.%20Slightly%20thinner%20in%20layers%20but%20more%20classy%20and%20easy%20to%20slice.%3Cbr%20/%3E%0A%3Cbr%20/%3E%0A%3Cdiv%3E%0A%3Ca%20href%3D%22https://blogger.googleusercontent.com/img/b/R29vZ2xl/AVvXsEjNbGVx_k3P80IK3dN5OAK7ARTenH71bt7yWXTbpk8Nm1QD0ThGMakeKZdMWCplyaOe0hyKVdEAv36L6mkDGZuQuNY0RyzERGdoW9QDza1P1p76Dr60-5Lyg3B81u9OzRiN_PoAzvoC7g97/s1600/qwer2.jpg%22%20imageanchor%3D%221%22%3E%3Cimg%20border%3D%220%22%20data-original-height%3D%22640%22%20data-original-width%3D%22480%22%20height%3D%22640%22%20src%3D%22https://blogger.googleusercontent.com/img/b/R29vZ2xl/AVvXsEjNbGVx_k3P80IK3dN5OAK7ARTenH71bt7yWXTbpk8Nm1QD0ThGMakeKZdMWCplyaOe0hyKVdEAv36L6mkDGZuQuNY0RyzERGdoW9QDza1P1p76Dr60-5Lyg3B81u9OzRiN_PoAzvoC7g97/s640/qwer2.jpg%22%20width%3D%22480%22%20/%3E%3C/a%3E%3C/div%3E%0AAnd%20this%20is%20the%20first%20batch%20I%20made%20with%20palm%20sugar%20and%20in%20a%20smaller%20container%20which%20is%20thicker%20in%20layers,%20but%20extremely%20extremely%20yummy.%20Gosh,%20feel%20like%20I%20wanna%20to%20make%20this%20again.%20Salivating%20just%20by%20looking%20at%20it.........%3Ci%3E%20haha....%3C/i%3E%26nbsp;Enjoy%20guys%20!%20And%20have%20a%20great%20week%20ahead.)


%3Cbr%20/%3E%0A5%20eggs%20(one%20egg%20for%20each%20roti)%3Cbr%20/%3E%0Apepper%20%26amp;%20salt%20to%20taste%3Cbr%20/%3E%0Asome%20spring%20onion,%20thinly%20sliced%3Cbr%20/%3E%0Ashredded%20cabbage%3Cbr%20/%3E%0Acherry%20tomato%3Cbr%20/%3E%0Amayonnaise%3Cbr%20/%3E%0A%3Cbr%20/%3E%0A%3Cb%3EMethod%20:%3C/b%3E%3Cbr%20/%3E%0A(1)%26nbsp;%20preheat%20frying%20pan%20then%20rub%20frying%20pan%20with%20a%20thin%20layer%20of%20butter%20or%20cooking%20oil.%3Cbr%20/%3E%0A(2)%26nbsp;%20once%20the%20heat%20is%20warming%20up,%20place%20in%20a%20piece%20of%20ready%20made%20roti%20canai%20and%20cook%20over%20medium%20heat%20till%20brown%20with%20both%20side.%3Cbr%20/%3E%0A%3Cbr%20/%3E%0A%3Cdiv%3E%0A%3Ca%20href%3D%22https://blogger.googleusercontent.com/img/b/R29vZ2xl/AVvXsEh18nwoxwdDIwyLhjFcr9Y7CNHf2clMrzi9hVhzZlGUc2yHrvx4GsbzKu1WE0pR6tgjbL3sJHuBt2C-Wj6lLirdzVk8434zNvcENbM0VoUh8anb65cCi9C8mhNlK09btwouo_UfNJlIdvUI/s1600/abcd.jpg%22%20imageanchor%3D%221%22%3E%3Cimg%20border%3D%220%22%20data-original-height%3D%22640%22%20data-original-width%3D%22480%22%20height%3D%22640%22%20src%3D%22https://blogger.googleusercontent.com/img/b/R29vZ2xl/AVvXsEh18nwoxwdDIwyLhjFcr9Y7CNHf2clMrzi9hVhzZlGUc2yHrvx4GsbzKu1WE0pR6tgjbL3sJHuBt2C-Wj6lLirdzVk8434zNvcENbM0VoUh8anb65cCi9C8mhNlK09btwouo_UfNJlIdvUI/s640/abcd.jpg%22%20width%3D%22480%22%20/%3E%3C/a%3E%3C/div%3E%0A(3)%20in%20the%20other%20hand,%20beat%20an%20egg%20then%20add%20in%20spring%20onion%20and%20some%20seasoning%20to%20taste.%3Cbr%20/%3E%0A(4)%20once%20the%20roti%20is%20done,%20set%20aside.%3Cbr%20/%3E%0A%3Cbr%20/%3E%0A%3Cdiv%3E%0A%3Ca%20href%3D%22https://blogger.googleusercontent.com/img/b/R29vZ2xl/AVvXsEhxpuKWB288DtMk3XguTkBTDlAK0NKDAHvzRbxNs3PtXFvtPTvUqYzIylZnM6ssaPhK50rp3Oc5_BuoESw2CxECKE3-J0GKdJwcPSicJJWKtklSXYElR-JTxR857mdEugOCG4jzy1vte-Gr/s1600/abcde.jpg%22%20imageanchor%3D%221%22%3E%3Cimg%20border%3D%220%22%20data-original-height%3D%22640%22%20data-original-width%3D%22480%22%20height%3D%22640%22%20src%3D%22https://blogger.googleusercontent.com/img/b/R29vZ2xl/AVvXsEhxpuKWB288DtMk3XguTkBTDlAK0NKDAHvzRbxNs3PtXFvtPTvUqYzIylZnM6ssaPhK50rp3Oc5_BuoESw2CxECKE3-J0GKdJwcPSicJJWKtklSXYElR-JTxR857mdEugOCG4jzy1vte-Gr/s640/abcde.jpg%22%20width%3D%22480%22%20/%3E%3C/a%3E%3C/div%3E%0A(5)%26nbsp;%20now,%20lower%20the%20heat%20and%20place%20in%20beaten%20egg,%20try%20to%20round%20it%20if%20possible.%3Cbr%20/%3E%0A(6)%26nbsp;%20then%20quickly%20place%20in%20cooked%20roti%20before%20egg%20is%20totally%20cooked,%20so%20that%20they%20will%20merge%20together%20easily.%3Cbr%20/%3E%0A(7)%26nbsp;%20when%20the%20egg%20is%20cooked,%20flip%20roti%20the%20other%20way%20round%20and%20place%20in%20mozzarella%20cheese,%20then%20again%20flip%20it%20the%20way%20round%20again.%20Let%20it%20cook%20for%20one%20second%20or%20till%20you%20get%20the%20smell%20of%20cheese.%3Cbr%20/%3E%0A%3Cbr%20/%3E%0A%3Cdiv%3E%0A%3Ca%20href%3D%22https://blogger.googleusercontent.com/img/b/R29vZ2xl/AVvXsEhgKAEsAg_OD58oCuSRZT29YYI_b4yecxuip6psFQGYAvGFZup2g56cqXBrgNmQiQ2-tMvsxUfRTFM9ilLJEFSxml4yBIUvA0gXCfnIEMR88oFacH8weH3vlPYX8u1s9WH-HTiV2UplKKlv/s1600/abcdef.jpg%22%20imageanchor%3D%221%22%3E%3Cimg%20border%3D%220%22%20data-original-height%3D%22640%22%20data-original-width%3D%22480%22%20height%3D%22640%22%20src%3D%22https://blogger.googleusercontent.com/img/b/R29vZ2xl/AVvXsEhgKAEsAg_OD58oCuSRZT29YYI_b4yecxuip6psFQGYAvGFZup2g56cqXBrgNmQiQ2-tMvsxUfRTFM9ilLJEFSxml4yBIUvA0gXCfnIEMR88oFacH8weH3vlPYX8u1s9WH-HTiV2UplKKlv/s640/abcdef.jpg%22%20width%3D%22480%22%20/%3E%3C/a%3E%3C/div%3E%0A(8)%20transfer%20to%20serving%20plate%20and%20throw%20in%20whatever%20you%20want%20for%20your%20fillings.%20For%20me,%20I%20am%20placing%20in%20some%20shredded%20cabbage%20and%20cherry%20tomatoes%20then%20top%20with%20some%20mayo.%20yum%20yum...%3Cbr%20/%3E%0A%3Cbr%20/%3E%0A%3Cdiv%3E%0A%3Ca%20href%3D%22https://blogger.googleusercontent.com/img/b/R29vZ2xl/AVvXsEiRV0tQGPA3T3IgnIOOYy-CBfu7BREjE8gLnQcg3_Zo7GjClq6gFVqYEKWE05hzX2bM5O8XTdzGYiMogENmqBH9E5-QaPCo7UZOzzhvN6O7gAR3Zp8TQ2h72Pg1kEShL3_yNaZruBTxQmAI/s1600/abc1.jpg%22%20imageanchor%3D%221%22%3E%3Cimg%20border%3D%220%22%20data-original-height%3D%22640%22%20data-original-width%3D%22480%22%20height%3D%22640%22%20src%3D%22https://blogger.googleusercontent.com/img/b/R29vZ2xl/AVvXsEiRV0tQGPA3T3IgnIOOYy-CBfu7BREjE8gLnQcg3_Zo7GjClq6gFVqYEKWE05hzX2bM5O8XTdzGYiMogENmqBH9E5-QaPCo7UZOzzhvN6O7gAR3Zp8TQ2h72Pg1kEShL3_yNaZruBTxQmAI/s640/abc1.jpg%22%20width%3D%22480%22%20/%3E%3C/a%3E%3C/div%3E%0AFinally,%20roll%20it%20up%20like%20a%20swiss%20roll%20and%20serve%20warm.%20Oh%20man,%20this%20is%20super%20delicious%20!%26nbsp;%20Bet%20your%20kids%20will%20ask%20for%20more.%20Enjoy%20!)

%3Cbr%20/%3E%0AIngredients%20:%3Cbr%20/%3E%0A100ml%26nbsp;%20coconut%20milk%20(mixed%20100ml%20coconut%20milk%20with%2050ml%20water)%3Cbr%20/%3E%0A2%20pcs%26nbsp;%20%26nbsp;%20kaffier%20leaves%3Cbr%20/%3E%0A1%20pce%26nbsp;%20%26nbsp;%20turmeric%20leaf%3Cbr%20/%3E%0Aa%20pinch%20of%26nbsp;%20granules%20(Ajinomoto)%3Cbr%20/%3E%0Asalt%20to%20taste%3Cbr%20/%3E%0A1/2%20tspn%26nbsp;%20%26nbsp;brown%20sugar%3Cbr%20/%3E%0A1/2%20TB%26nbsp;%20%26nbsp;%20Kerisik%20kelapa%20(toasted%20coconut)%3Cbr%20/%3E%0A20%20medium%20size%20prawns%3Cbr%20/%3E%0A%3Cbr%20/%3E%0AIngredients%20for%20%3Ci%3E%3Cb%3Eblended%20paste%3C/b%3E%3C/i%3E%20:%3Cbr%20/%3E%0A3%20shallots%3Cbr%20/%3E%0A4%20cloves%26nbsp;%20garlic%3Cbr%20/%3E%0A6%26nbsp;%20dried%20chili,%20boiled%20to%20soft%3Cbr%20/%3E%0A1%20inch%26nbsp;%20%26nbsp;glangal/blue%20ginger%3Cbr%20/%3E%0A1%20stick%20lemongrass,%20take%20the%20white%20part%3Cbr%20/%3E%0A100ml%26nbsp;%20cooking%20oil%3Cbr%20/%3E%0A2%20inch%26nbsp;%20%26nbsp;turmeric%20root%20or%20(2%20tspn%26nbsp;%20turmeric%20powder)%3Cbr%20/%3E%0A(blend%20everything%20into%20puree)%3Cbr%20/%3E%0A%3Cbr%20/%3E%0A%3Cb%3EMethod%20:%3C/b%3E%3Cbr%20/%3E%0A(1)%26nbsp;%20preheat%20wok%20with%201%20tablespoon%20of%20cooking%20oil,%20stir%20in%20blended%20paste%20and%20cook%20till%20fragrant%20or%20pecah%20minyak.%3Cbr%20/%3E%0A(2)%26nbsp;%20next,%20add%20in%20coconut%20milk,%20kaffir%20leaves,%20turmeric%20leaf,%20kerisik%20kelapa,%20sugar%20%26amp;%20salt,%20cook%20over%20medium%20heat%20till%20slightly%20dried.%3Cbr%20/%3E%0A(3)%26nbsp;%20now,%20add%20in%20prawns%20and%20stir%20gradually%20till%20cooked%20thoroughly%20and%20slightly%20dried.%3Cbr%20/%3E%0A(4)%26nbsp;%20Finally,%20serve%20with%20thinly%20sliced%20turmeric%20leaf%20on%20top.)


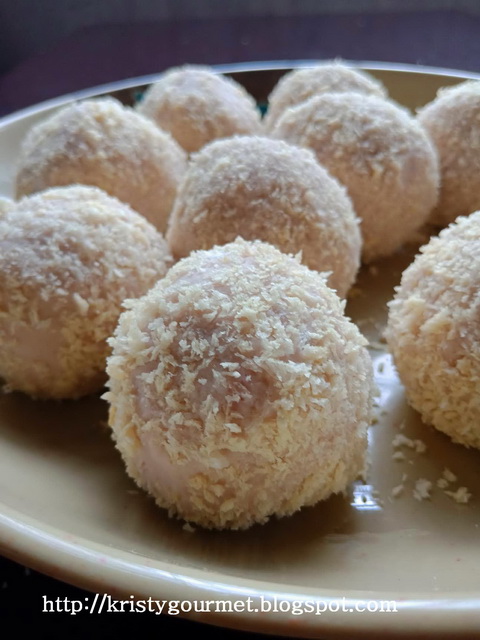


,%20cut%20in%201/2%22%20length%3Cbr%20/%3E%0A2%20tspn%26nbsp;%20curry%20powder%3Cbr%20/%3E%0A1/2%20tspn%26nbsp;%20cumin%20powder%3Cbr%20/%3E%0A1/2%20tspn%26nbsp;%20fennel%20powder%3Cbr%20/%3E%0A1/2%20tspn%26nbsp;%20coriander%20powder%3Cbr%20/%3E%0Ahandful%20of%20curry%20leaves,%20washed%3Cbr%20/%3E%0A%3Cbr%20/%3E%0AIngredients%20for%20%3Cb%3E%3Ci%3Eblended%20paste%3C/i%3E%3C/b%3E%20:%3Cbr%20/%3E%0A4%20shallots%3Cbr%20/%3E%0A1%22%26nbsp;%20galangal/blue%20ginger%3Cbr%20/%3E%0A4%20clove%20garlic%3Cbr%20/%3E%0A3%26nbsp;%20lemongrass%20only%20the%20bottom%20white%20part%3Cbr%20/%3E%0A5%20dried%20chilies,%20cook%20to%20soften%3Cbr%20/%3E%0A%3Cbr%20/%3E%0A%3Cb%3EMethod%20:%3C/b%3E%3Cbr%20/%3E%0A(1)%20pound%20cut%20lemongrass%20with%20a%20pestle%20till%20turns%20into%20fine%20shreds.%3Cbr%20/%3E%0A(2)%20heat%20up%20the%20blend%20ingredients%20with%203%20tablespoon%20of%20cooking%20oil%20till%20fragrant,%20then%20puree%20it%20into%20paste.%3Cbr%20/%3E%0A(3)%20combine%20blended%20paste,%20curry%20powder,%20cumin%20powder,%20coriander%20powder%20%26amp;%20curry%20powder%20together%20and%20mix%20till%20well%20cooperated.%3Cbr%20/%3E%0A%3Cbr%20/%3E%0A%3Cdiv%3E%0A%3Ca%20href%3D%22https://blogger.googleusercontent.com/img/b/R29vZ2xl/AVvXsEizMWRV3c4YT80kooesK2RhXFr7CFYa1XXlX89o19qURg-eSHU-xXlO4m_CgVCcVWuaAy4N0hAfKukjNABNyGrZDGn8AMY8SSkh3z3I8pEmsIvlJM1b6VpAATgVphz6hQr_Z1DLIsIFNjbA/s1600/AF+ayam+bermpah+3.jpg%22%20imageanchor%3D%221%22%3E%3Cimg%20border%3D%220%22%20data-original-height%3D%221600%22%20data-original-width%3D%221200%22%20height%3D%22640%22%20src%3D%22https://blogger.googleusercontent.com/img/b/R29vZ2xl/AVvXsEizMWRV3c4YT80kooesK2RhXFr7CFYa1XXlX89o19qURg-eSHU-xXlO4m_CgVCcVWuaAy4N0hAfKukjNABNyGrZDGn8AMY8SSkh3z3I8pEmsIvlJM1b6VpAATgVphz6hQr_Z1DLIsIFNjbA/s640/AF+ayam+bermpah+3.jpg%22%20width%3D%22480%22%20/%3E%3C/a%3E%3C/div%3E%0A(4)%20marinade%20chicken%20with%20salt%20then%20set%20aside%20for%2015%20minutes,%20then%20rub%20in%20blended%20mix%20paste,%20curry%20leaves%20and%20pounded%20lemongrass.%20Leave%20to%20rest%20for%202%20hours%20but%20its%20best%20overnight.%3Cbr%20/%3E%0A%3Cbr%20/%3E%0A%3Cdiv%3E%0A%3Ca%20href%3D%22https://blogger.googleusercontent.com/img/b/R29vZ2xl/AVvXsEjg9PHWXfcV8t_SBP6vZPaowiO3TGY-YaCwGDH3scND_YEJyMeCjEuSfipwfTsrQDRnEP17i-5hU8bvMtYHREmmdMfZzUb_YTqMemLnuHasJB8y9Jz-VWvztnXTiJGeg1PRUV_KzVTQ11H-/s1600/AF+ayam+berempah+4.jpg%22%20imageanchor%3D%221%22%3E%3Cimg%20border%3D%220%22%20data-original-height%3D%22640%22%20data-original-width%3D%22480%22%20height%3D%22640%22%20src%3D%22https://blogger.googleusercontent.com/img/b/R29vZ2xl/AVvXsEjg9PHWXfcV8t_SBP6vZPaowiO3TGY-YaCwGDH3scND_YEJyMeCjEuSfipwfTsrQDRnEP17i-5hU8bvMtYHREmmdMfZzUb_YTqMemLnuHasJB8y9Jz-VWvztnXTiJGeg1PRUV_KzVTQ11H-/s640/AF+ayam+berempah+4.jpg%22%20width%3D%22480%22%20/%3E%3C/a%3E%3C/div%3E%0A(5)%26nbsp;%20when%20ready,%20arrange%20to%20air%20fryer%20with%20a%20baking%20paper%20lined%20below.%20And%20bake%20at%20200'C%26nbsp;%2030%20minutes%20then%20turn%20it%20around%20and%20bake%20at%20195'C%20for%20another%2025%20minutes.%3Cbr%20/%3E%0A%3Cbr%20/%3E%0A%3Cdiv%3E%0A%3Ca%20href%3D%22https://blogger.googleusercontent.com/img/b/R29vZ2xl/AVvXsEhZUQs2mkuonmIDzLyL18KV4kZm0v0G2O6fzzQhW3QMb88arjI0gLn6O13cZzIJW9nBlPfdTVOOlHe5pqq4KwL-bBlxuHmiSQyAmW1JaNuA2YXgOrGFTmlzLWtOqzB8c1mxEt65tDUqb_vu/s1600/AF+ayam+berempah+6.jpg%22%20imageanchor%3D%221%22%3E%3Cimg%20border%3D%220%22%20data-original-height%3D%22640%22%20data-original-width%3D%22480%22%20height%3D%22640%22%20src%3D%22https://blogger.googleusercontent.com/img/b/R29vZ2xl/AVvXsEhZUQs2mkuonmIDzLyL18KV4kZm0v0G2O6fzzQhW3QMb88arjI0gLn6O13cZzIJW9nBlPfdTVOOlHe5pqq4KwL-bBlxuHmiSQyAmW1JaNuA2YXgOrGFTmlzLWtOqzB8c1mxEt65tDUqb_vu/s640/AF+ayam+berempah+6.jpg%22%20width%3D%22480%22%20/%3E%3C/a%3E%3C/div%3E%0AIf%20your%20chicken%20wings%20turned%20out%20very%20light%20in%20colour%20then%20it%20is%20not%20ready%20yet%20!%26nbsp;%20Put%20it%20back%20to%20air%20fryer%20and%20bake%20for%20another%20few%20more%20minutes.%20Unlike%20the%20BBQ%20chicken%20wings%20which%20easily%20cooked.%20The%20colour%20should%20be%20much%20darker%20than%20this%20one%20here.)